One of the cool tricks you can do with Logic’s Drummer regions is to drag out an alias of the Drummer region to another software instrument track. (Drag a Drummer region with mouse while holding Shift-Option).
Aliases are virtual regions with no content of their own – they just follow another region’s content (although you can still do stuff to them like transpose them etc).
Shift-Option drag Drummer region to create an alias
This new software instrument track can be another Drum Kit instrument, or a Drum Machine, sampler or even a third-party drum instrument like Slate’s SSD drum sampler.
Now your new instrument track (via the alias) will play exactly the same thing as the Drummer pattern. Even if you go back and tweak Drummer the alias will still follow it. And if you mute the Drummer region, the alias still works, and you will continue to hear the Drummer pattern through your new drum instrument.
That’s pretty cool, but what if you don’t want to layer the entire kit – perhaps just the kick or the snare?
That’s easily done too;
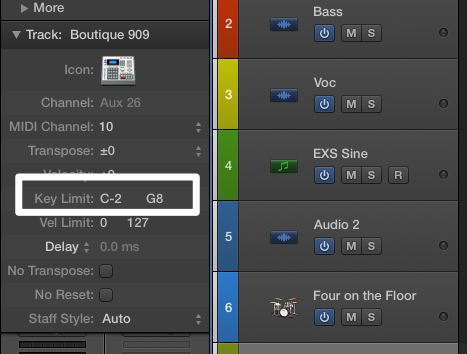
On the new alias instrument track, go to its Track Inspector pane. It’s the second box down in the Inspector window on the left. It’s usually hidden, so you might have to click the little disclosure triangle to pop it down.
Now you should see a “Key Limit” line, with something like “C-2 G8” in it. These are the low and high key limits, and it means that this track will currently accept MIDI notes over the full range of possible MIDI notes from C-2 up to G8.
Set the track’s Key Limit range down to a single note – eg C1 for Kick drum, or D1 for Snare
If you only want to trigger the kick, double click the “C-2 G8” and type in “C1”. You should see two C1’s – meaning only this one MIDI note will now be accepted. You should only hear the kick drum.
And if you want a layered snare as well?
With the same instrument; Create another Virtual Track going to the same instrument; Menu: Track/Other/New with Same Channel
Drag a copy of the alias to this track. (Option-drag alias with mouse)
On this track, double click the Key Limit numbers and type in “D1”. This will now only accept the snare MIDI note.
With another instrument; Create another software instrument track and dial up a drum patch.
Drag a copy of the alias to this track. (Option-drag with mouse)
On this track, double click the Key Limit numbers and type in “D1”. This will now only accept the snare MIDI note.
As you’ve probably figured out by now, you can carry on and layer as many extra kicks and snares on different drum instruments as you feel like.
Bonus tip for handy kick and snare layers:
Load up an instance of an EXS24 in a new instrument track. (In the Patch Library select Legacy/Logic/Logic Instruments/EXS24)
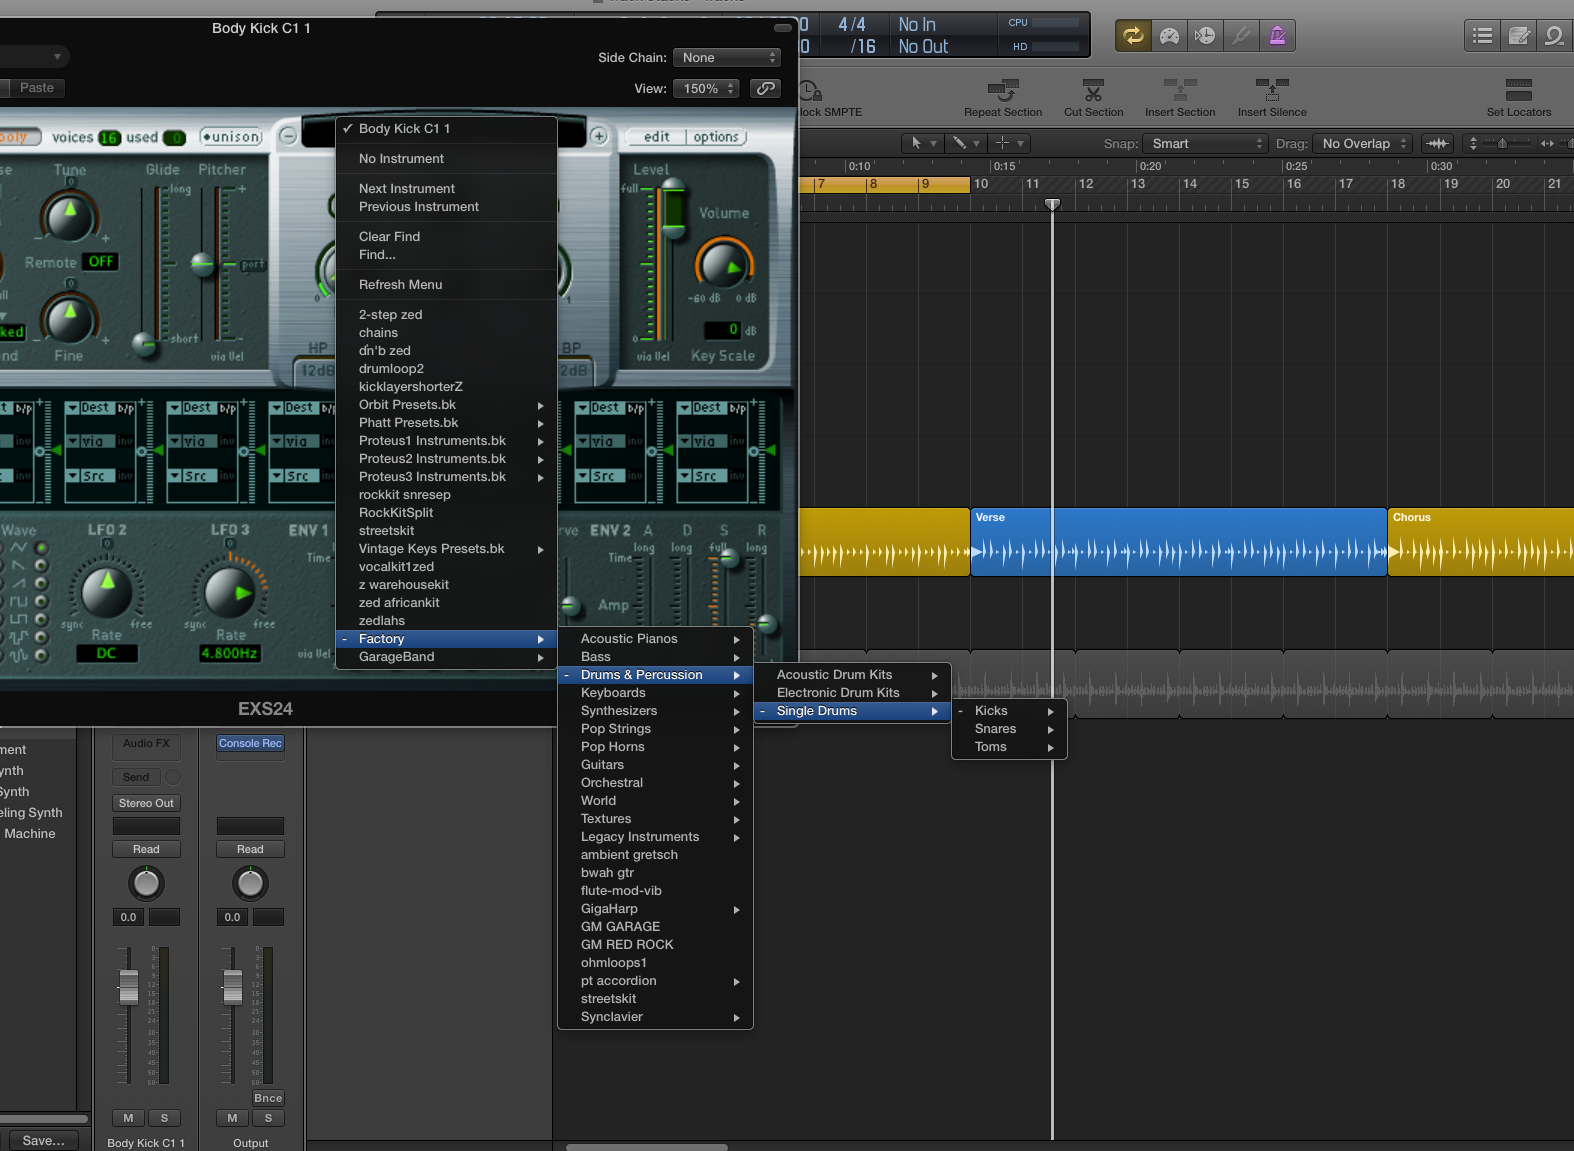
Click the EXS24 slot on the channel strip to open the EXS24 front panel up.
EXS24 Kick Drum Layer Samples
In the little panel above the Cutoff Knob, click and select Factory/Drums & Percussion/Single Drums/Kicks/Layer Kicks/Body Kick C1 1. If you click the little “+” symbol to the right of the panel you can step through each sample in turn.
As you can see there’s a whole bunch of “body” and “transient” kicks (and snares) that can be used to layer your existing kicks (and snares). Some of these sound great, although the “body” kicks sound unusual by themselves as they’ve had the transient part trimmed off the front.
Drag your Drummer alias onto one of these EXS24 tracks and set the Key Limits for the track as explained above and you’re away laughing.
My glory years of audio engineering were right at that transition between analogue and digital formats. My battles seemed to be between the harsh discipline of digital and the casual looseness of analogue. I became a bit of a cultist in league of getting that “analogue sound” on digital gear. And the trouble with cults, of course, is that you stop questioning things.
In my case I became so fixated upon just keeping my recording levels down (firm look/which is generally a good thing by the way! /firm look), that I forgot that with analogue-modeled plugins, overloading the input is the same as overloading the analogue unit itself. That means if you drive it hard, that instead of the usual shitty digital clipping events, you get a nice analogue harmonic-related distortion. Which means “musically-related” and pleasant. Anyone who’s ever seen a true analogue-based recording session (ie on actual tape) knows that those tape-recorder VU meters are usually pinned to the top. For some reason, our ears love the sound of harmonic distortion added to the original signal. It sounds more exciting and vibrant, while at the same time smooth and mellow. I think we will all agree that this can only be the perfect combination of anything.
So, as you’ve probably guessed, I was holding back from driving the inputs of my “analogue” digital plug-ins, as I had trained myself to avoid digital clipping. And this led to a pretty average impression of many of the cool UAD analogue-modeled plugins I had. Sure, they still sounded better than the average “digital” plug-in – but it was often subtle – just a hint of smooth silky velvet and random pleasant “character”.
Then I tried out the new Manley Variable Mu Limiter Compressor. I don’t know about you, but I can’t help but feel that there’s something inherently cool about the word “Mu”. Especially “Variable Mu”. Brrrr.
So I dialled up a few Manley (Variable Mu – sorry just had to say it again) patches here and there – “yeah I can hear it working – nice… nice”. Dialled up the patch “GG-The Fast Tickle”. Yeah beauty… nice. Then out of some crazy impulse (yeah I’m like that – completely unpredictable), I wind the HELL out of that input knob. I know – radical right? But, you know, I finally got the hug (well the song did) that EveAnna Manley promised us with this unit. It really does just grab everything and bring it together like a big group hug. I don’t know about you, but that sounds… awesome.
Izotope Ozone is a multi-tool mastering stand-alone application and multi-format plug-in. Version 6 has some significant changes over previous versions including a different interface. It comes in plain and Advanced versions. Ozone 6: $249 USD, Ozone 6 Advanced: $999 USD.
Good: Great sound, easier to use, better look and feel, some cool new features and more flexibility in multi-band modes. New Dynamic EQ in Advanced version. Bad: Removed “Amount” sliders. Advanced version is overpriced.
8 out of 10 – Worth buying/upgrading.
Izotope’s Ozone has become quite a stalwart of the low-to-mid-budget mastering scene over recent years. One of its key advantages is having an entire suite of mastering-ready tools condensed into a single mastering plug-in.
Frequency Soloing
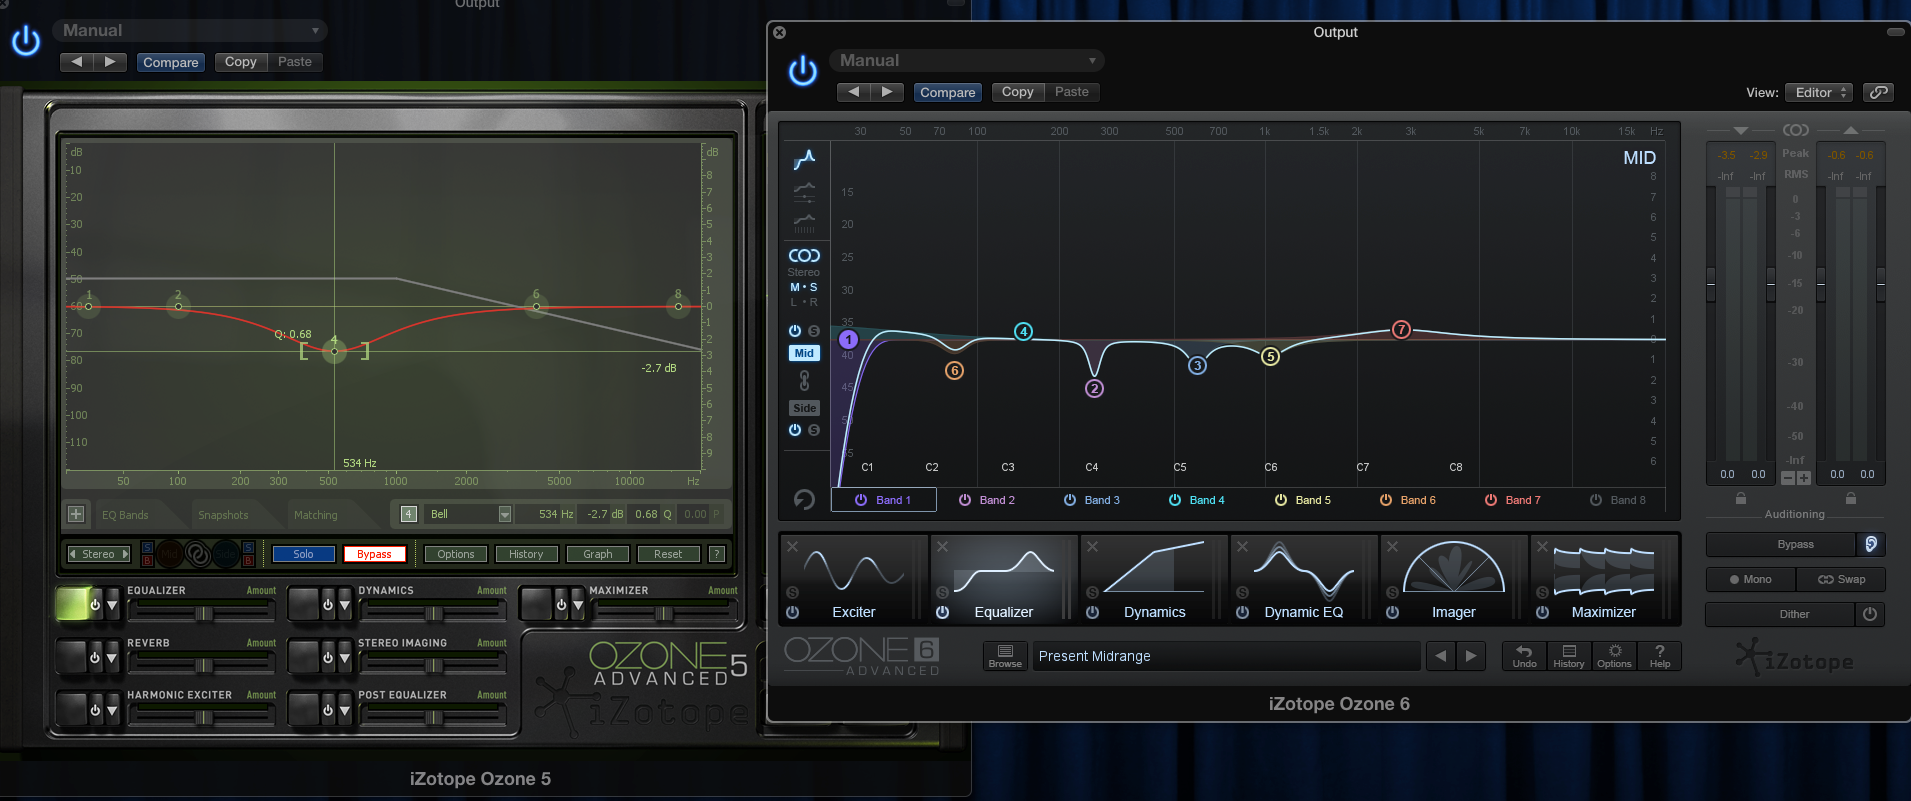
My own favourite reason for using Ozone over other mastering products was the cool trick of being able to hold down the Alt/Option key and then click in the EQ display with the mouse to solo a particular frequency. This made finding troublesome resonant frequencies ridiculously simple, fast and intuitive, and even when I moved into using other mastering tools, I still preferred Ozone’s EQ section for my precision-repair EQ’ing purposes. In the very-expensive Advanced version, each processing module also comes as a separate plug-in, so working with other mastering plug-ins is easy. I’m very glad to see this feature has not vanished in Ozone 6.
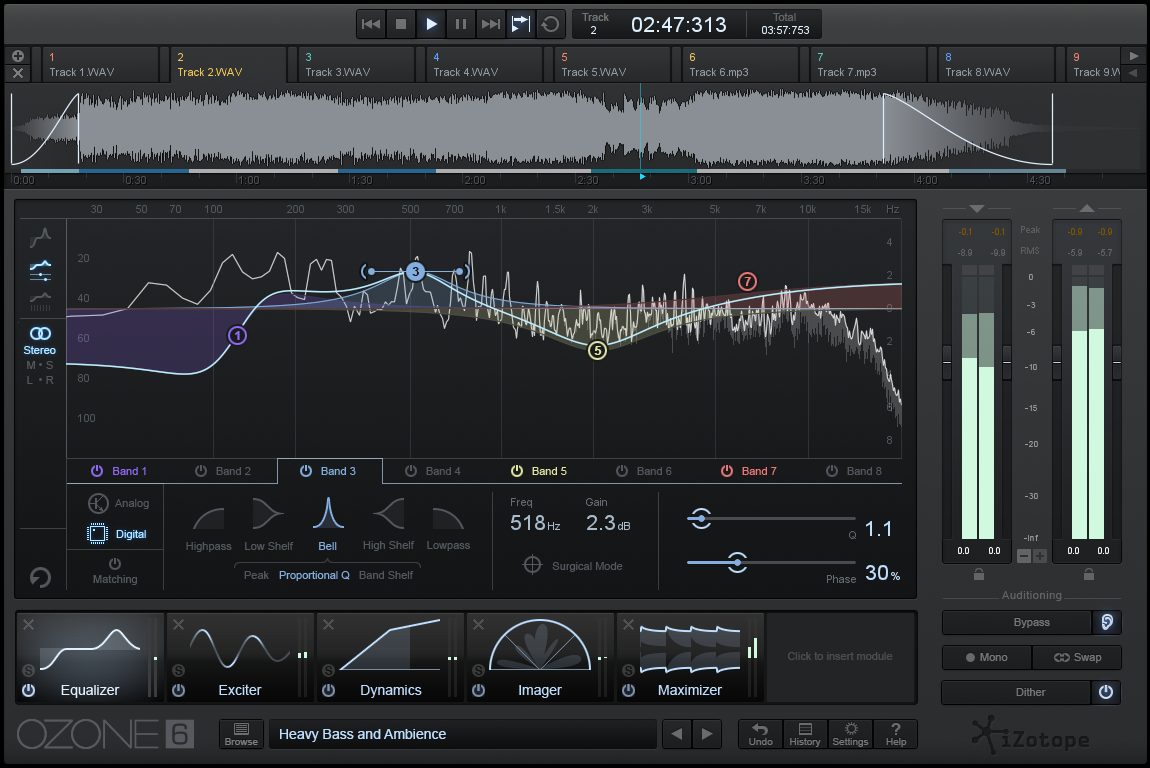
EQ Section
On the surface, not a lot different that it was before, but laid out a lot better. There’s eight EQ bands that can be switched between high pass/low pass/bell/high and low shelf and Baxandall (new) filter types, and as usual an excellent spectrum analyzer that lets you see a detailed view of what’s going on in the mix.
There’s a global button for Digital and Analogue EQ modes. Analogue mode includes the phase-shifts from real EQ types that add their own phase responses, and you can even select different types of filters depending on their type – including Analog, Vintage, Baxandall, Brickwall, Proportional-Q, Band-shelf and Resonant modes. If you want to see exactly what’s going on with phase, there’s also an optional display of Phase Delay, Phase Response and Group Delay.
If analogue colour is not your thing, then the Digital mode avoids it almost completely. You can switch into “Surgical” mode for super-accurate editing of EQ. But then you can still tweak the phase response for each band with a little “phase” slider.
And as with previous versions of Ozone, there is a “Matching” button for matching an EQ sourced from another track, or even against Pink Noise or 6dB Slopes.
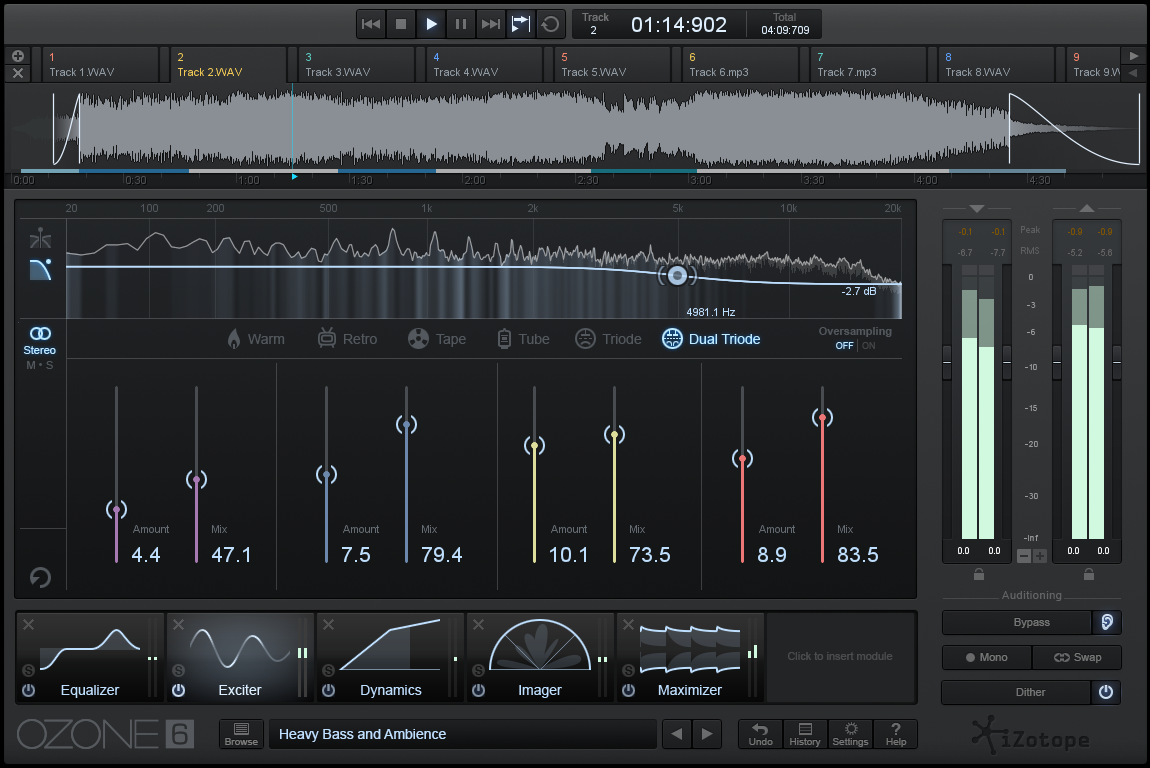
Amount Sliders
One of the things I immediately noticed was missing in Ozone 6 was the “Amount” sliders. In Ozone 5, these handy sliders scaled the processing amount for each section (and globally). This was a convenient way to correct some heavy-handed tweaking after spending too long in the mastering zone, and provided much more detailed feedback on exactly how much processing was needed than the simpler “Bypass” button. I can’t believe this awesomely useful feature was removed – it seems like such a major step backwards. The Parallel and master Gain sliders in the dynamics section do go some way towards matching the features but nowhere near enough.
Multi-band Sections
Finally, the multi-band dynamics, exciter and imager sections can each have an independent number of bands and different crossover frequencies. And even different types of crossover as well – analogue, digital or hybrid.
This is great news – it’s often been hard to find an ideal crossover point that suits all three processors at the same time.
Actually it’s often difficult to find the ideal crossover points at all – most people I know don’t even touch the preset ones.
Ozone 6 has a added a new “Learn” feature to each multi-band section that can automatically set the crossover points based on the audio itself. it’s certainly fun watching the crossovers whizzing all over the place as they detect what’s going on in the audio spectrum, and they seem to settle not far away from where I’d put them myself. Nice!
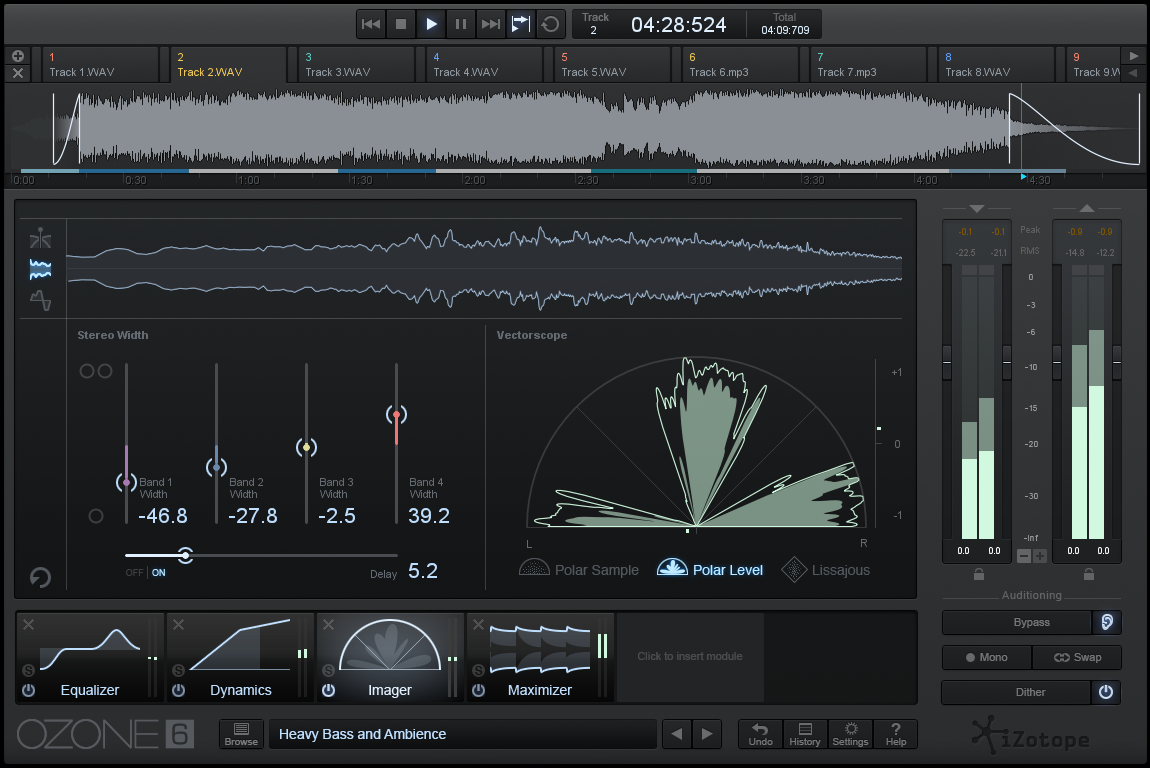
Mid-Side Processing
As with Ozone 5, the new version has M/S processing in its EQ, Dynamics, Exciter and also in the (Advanced-version-only) Dynamic EQ sections. Mid-side processing has become quite common in mastering workflows, and allows the center of the mix to be treated separately from the outsides. This gives increased control over things like vocals vs guitars.
Dithering
I notice that the dithering algorithm choices have been reduced from three to just one; MBIT+. This makes sense, as most people probably just used the default setting (if at all!). One nice addition here is being able to see the dither noise-shaping curve itself.
Mastering Reverb
The Mastering Reverb has gone in Ozone 6 as well. I’ve only ever used this twice in all my years of mastering with Ozone, and I’m guessing it caused problems with amateurs adding reverb to mixes they shouldn’t, so it’s probably safer to not have it.
Look and Feel
Looking at the overall look and feel of the new Ozone 6, it appears that they have adopted some of the design simplifications that have been applied to other Izotope products such as Alloy. I think these changes are generally an improvement – everything feels much more transparent and a bit simpler to use. There’s less visual confusion, and the simpler more 2-D look actually works well.
Processing Module Section and Browser
I really like the new modular tab along the bottom. Various processing modules can be added and removed and the order of them changed by simply dragging them around. This sort of functionality was present back in version 5 to some extent (it was called “Graph”), but it was significantly more limited than this new version. It’s simple to use. Being able to move the multi-band sections around as easily as the single-band sections is a big plus.
Standalone Mastering
One of the cool new things with Ozone 6 is that it is not just a plug-in, it is also a standalone app that can import audio files directly.
(Although not mp4 MPEG2 file formats which is a shame – it will ironically open poorer-quality mp3s though). It would be good to see 32-bit float file formats supported as well.
You can open multiple files as a project and have different Ozone settings on each file, as well as reshuffle the track order, and do bulk exports. Although each track has handles for trim and fades, it doesn’t allow you a full CD-layout with associated song overlaps and index markers etc. Each file still remains individual, so if you’re doing CD production you’ll still need a specialist application that can create a CD playlist such as Apple WaveBurner, Sony Sound Forge, Steinberg Wavelab, or DSP-Quattro.
As a real bonus, you can also insert other plug-ins (VST or AU) within the standalone app.
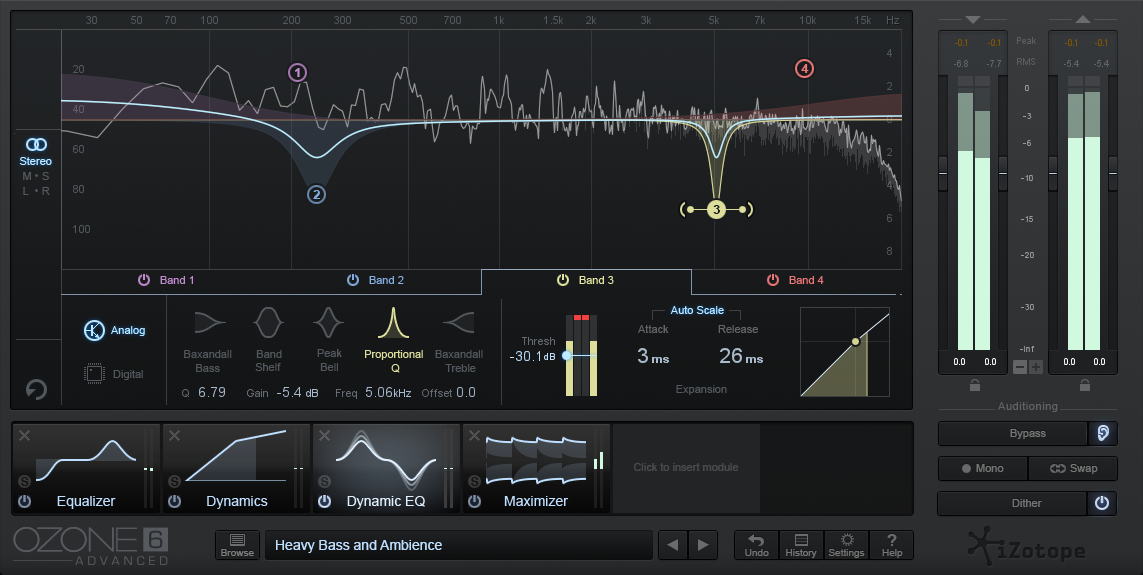
Dynamic EQ
Another new thing in Ozone 6 is the Dynamic EQ (in the Advanced version only). I’m somewhat familiar with the Brainworx Dynamic EQ and this works in similar fashion – although the Ozone one is a little simpler. You set an EQ and adjust the trigger threshold and it variably boosts or cuts that frequency band depending on its audio level and depending on whether you applied a boost or a cut. You can flip the response the other way as well (ie it will cut instead of boost or vice-versa). It’s pretty cool, and in many ways is a good substitute for a single-frequency-band treatment using Ozone’s multi-dynamics section. Great for rumbly sound-hole acoustic guitar tracks.
Insight Plug-in
As with Ozone 5. the Advanced version comes with the Insight plug-in. This is an advanced metering plug-in that not only gives several more metering options, including LUFS and other TV and film-based loudness meters, but also allows collective metering of multiple tracks in your recording session.
Conclusion
Overall this is a good offering from Izotope. The sound quality is superb as expected, and the new and expanded features are excellent. Almost anyone should be able to pick up and use this plug-in, and the fact that it can be used as a standalone mastering processor will tilt the balance for many people.
I’m still a little gobsmacked about the lack of “Amount” sliders, but the other great features help balance this loss out. Maybe they’ll add them back in in a future release. We can only hope.
Regardless, upgrading to Izotope 6 would generally be a good value decision.
On the other hand the Advanced version would take more careful consideration.
It’s a shame the “Advanced” version is so ridiculously expensive. At $999 USD (that’s nearly $1,300 where I live) it’s FOUR TIMES the price of the vanilla version.
That puts it well out of the reach of most casual users and small studio owners, and although I agree most of the missing features would genuinely be considered “pro” it’s such an artificial and arbitrary method of getting extra money out of users, and consumers see this sort of thing as a bit of a rort – a poor pricing strategy that can eventually have fallout on a brand. Personally, I would be tempted to just invest the difference in price into other nice mastering plug-ins from other reputable suppliers like UAD or Slate. Izotope seriously needs to look at their pricing strategies in this regard.