That’s a very long name for a piece of virtual equipment, and that’s even with a few abbreviations. Along with the classic Lexicon 224 which has been UAD-modelled for a few years now, this has always been on my list of most desired effects units.
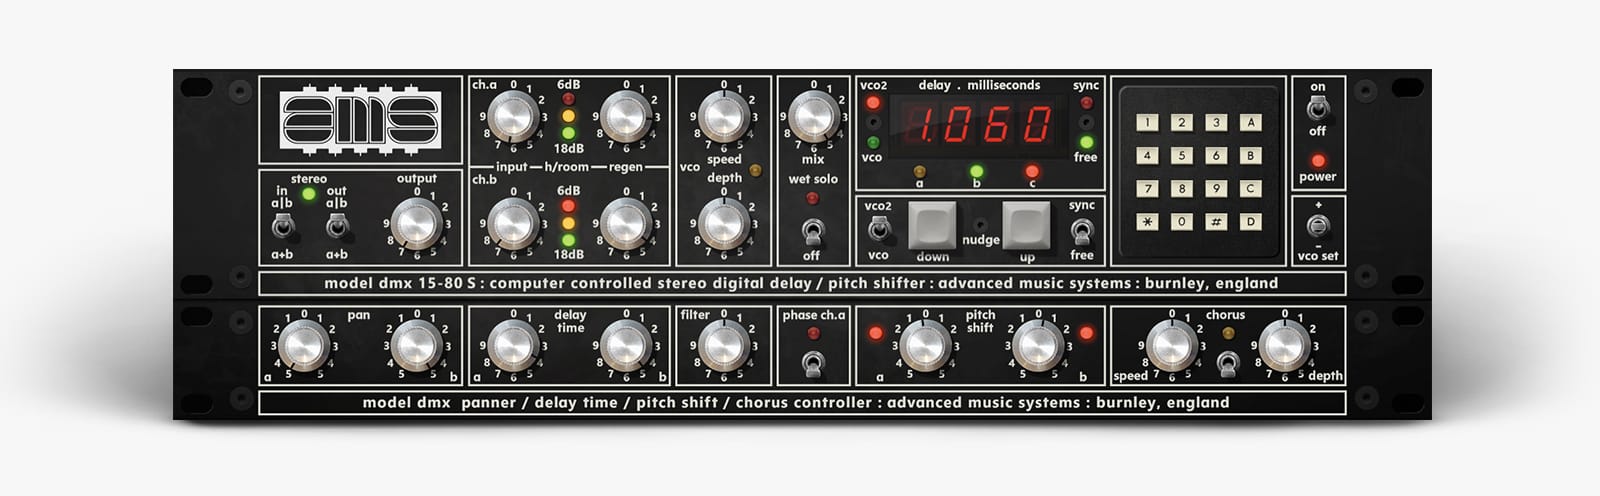
The original piece of equipment this software was based on was one of the essential pieces of kit (and early digital kit at that) found in major studios from the late 70’s onwards. Made in England by Advanced Music Systems (AMS were later bought by Neve), ostensibly it was a 15-bit digital delay, but it did so much more than that. It was a sampler, and could do pitch changes, and also had an extra chorus module in some versions.
I remember being in a New Wave band in the early 80’s and recording at a major recording studio in Auckland, NZ. I also remember having to pay an extra $150 to use this beauty in our session. In our case it was to cut and paste audio (a long drum roll actually) between different sections of a song. Back in the day this was one of the only ways to cut and paste audio without bouncing between synced analogue tape machines. And you could also pitch shift stuff after it was sampled (hello vocal tuning). It was pretty revolutionary at the time.
But apart from the sampling trickery, it was also just a damn fine digital delay and pitch shifter. The pitch shifter was so smooth. It had a great stereo width patch that sounded amazing on vocals (now well-known as the “Phil Collins” vocal sound), and a great simulated tape slap echo sound as well. Both of these are embedded in so many mixes from the 80’s, I would buy one of these just for those two patches. Oh and for the nice modulated guitar patches as well. Some of these sounds are so iconic.
The UAD modelled version of the original hardware certainly lives up to the magic of the original. I dialled-up a few of the presets and immediately had nostalgia goosebumps. It just sounds lovely.
As usual Universal Audio have combined some features from different model variations (like the expanded Chorus module) and added some plugin-only features like tempo-sync, mix controls and an extra VCO. You can also manually change the bit-depth of the unit between 15, 14, 13 and 12 bits.
I’ve now ended up adding this plug-in to all the mixes I’ve been working on lately because it sounds so good.
Is it worth the $299USD asking price? I personally would say yes. In theory you can construct exactly the same sort of effects chains using other digital delay, pitch shifter and chorus plugins, and I’ve been doing that sort of thing for many years anyway. But there’s something about just dialling-up one of the many patches on this thing and it just magically creating the sound I’ve been trying to match for so long. It’s way better than what I’ve been cobbling together so far – it’s smoother and warmer, more solid and just blends beautifully into the mix.
So for me, it’s been on my wish list for so many years, and I’ve never quite captured that same sound, and I just want it. The price does hurt a little – but typically with UAD you’re getting a pretty faithful recreation of vintage hardware that used to cost many thousands of dollars. Plus I’ve paid way more than this over the years just in renting the original hardware unit, so I guess that’s a bit of a reality check.
Thanks very much to Leon and the Auckland Rock Shops for supplying this review model.
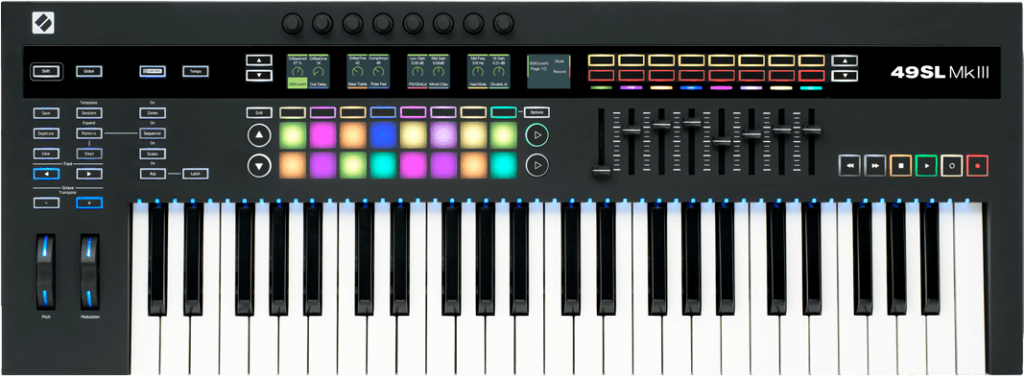
The 49Key version of the MkIII
I have been using an older Novation 49SL MkII MIDI controller keyboard for years both in the studio and on the road, and despite still being rock solid play-wise, the continual abuse was finally starting to take its toll. The USB port was getting a little sloppy, and the joystick was getting so physically worn it wouldn’t reliably center anymore, despite an attempt at cleaning the pots. I was also a little over the weirdness of the Automap app that came with the Novation to allow integration into DAWs – it was very powerful, but I found it too complex to use in day to day studio applications and it was also prone to causing its own issues due to it’s complexity with wrapping plugins and the extra layer of abstraction. Or maybe it was just me.
Regardless, I had been looking towards purchasing another keyboard controller, with the following thoughts in mind:
I wanted to get another nice-feeling key bed. Some of the cheap keyboards feel too light. I wanted aftertouch – most of the mid-price-range controllers don’t have this feature, and it’s very useful at times. I wanted more than 49 keys but not a full 88 notes. I wanted some simple programmability to split and map the keyboard for live use. And I wanted a brand I knew to be reliable and well-built, ideally with a solid and reliable fast-scanned key-bed and semi-weighted keys.
I’ve used many other MIDI keyboards through my teaching job, and many were quite good, but apart from most having a cheaper feeling keyboard and sometimes a certain “flex” to the chassis, they usually also wore out quickly – especially the pitch-bend controller. I also wanted more trigger pads than the old keyboard, with both Ableton and the new Logic Live Loops compatibility. So in browsing the available products there seemed to be many choices, but there always appeared to be missing features.
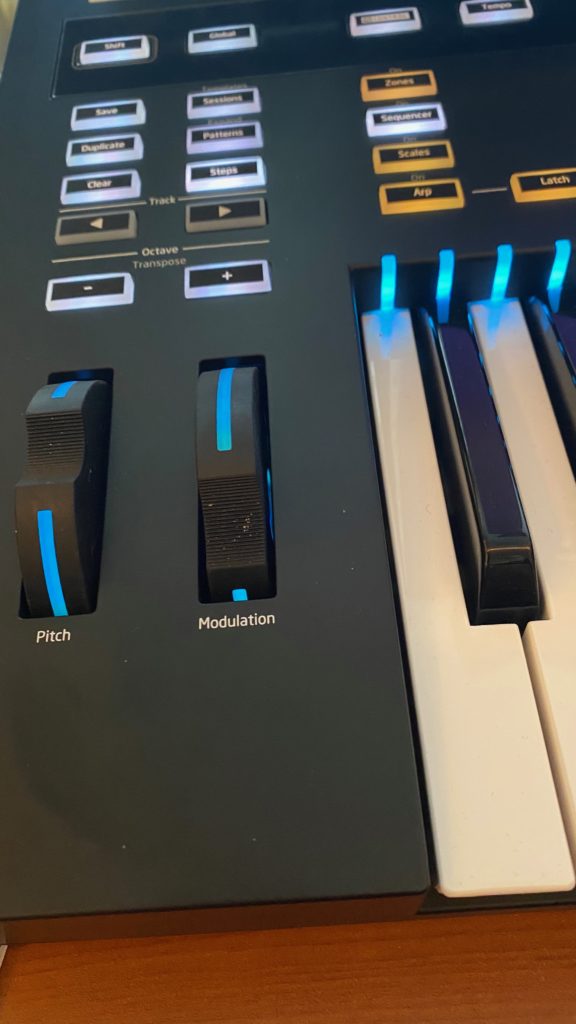
Then I spotted the new Novation SL MkIII. I wasn’t sure I liked the look of it at first – a fairly typical black plastic boxy-looking thing, compared with the more sleek and attractive older silver and black MkII model. It had the separate pitch bend and modulation wheels compared with the single joystick that I’d become used to, but from prior experience this meant it was easier to service so I was cool with that. It had more buttons and pads but less knobs than the old model, but to be honest I never used all of them anyway. Also gone was the square touch pad controller, which I rarely used but made a great guitar pick holder in the studio.
I spent a bit of time checking out the available promo videos on the Mk III. The features actually looked pretty cool – way more than what I thought I might need, to be honest. They really had designed it to be a performance-based keyboard at the center of a setup, with built-in sequencing and arpeggiator features and multiple zone splits. And dual CV/gate/mod outputs and a clock for controlling modular synths. I’d been avoiding that modular money trap, but maybe one day…
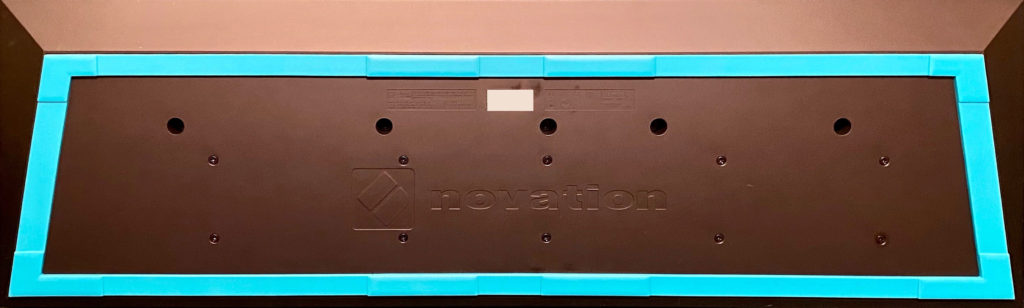
First impressions. Well-packaged and quite solid. Does not feel plasticky and does not flex like some cheap units. A little heavier than my old keyboard, but not that much. A rubberised strip running right around the base of the keyboard makes it grippy regardless of whatever type of stand you use. My old keyboard used to slide around on the stands all the time. Sometimes the simple things are a winner and this simple little feature is amazing.
That strip is super-grippy
The MkIII needs a separate power supply which my old MkII didn’t need – that one could run on USB power only. One more wall-wart to find a space for. Sacrifices must be made for all the extra features I guess.
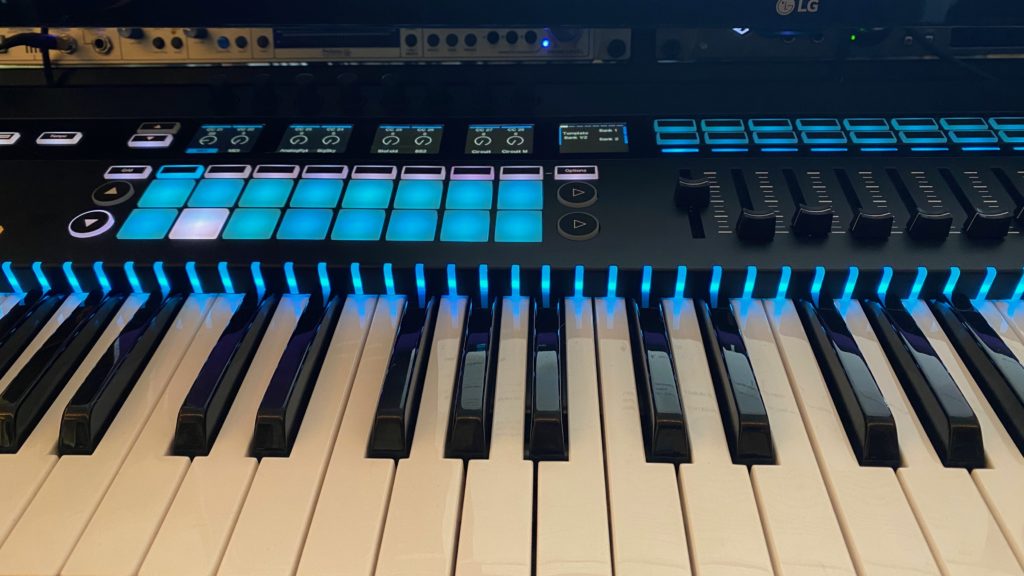
OMG – it’s like a light-show when you plug it in. Nothing can prepare you for the LED splendor of this device. It’s almost a bit much. But – it’s very useful stuff to give you feedback on modes/zones and all that. There’s been a lot of thought gone into this visual feedback system. There’s a RGB LED above every key that is coloured to indicate the key zones (there’s just one zone initially) and each LED brightens when you play the associated key. Oh – and if you stop playing for a bit, it goes into a kind of screen-saver mode, with scanning colours going across all the LED’s in a wave. Very relaxing. It wakes instantly when you touch anything though.
There’s five little square TFT colour displays that show detailed information such as knob positions and mappings and various menu selections. Each is under a pair of the 8 continuous rotary knobs at the top with an extra TFT set to the right for extra info and context. The knobs feel very smooth but are unlit and black and hard to locate under dim lighting. The rubbery RGB backlit buttons have a really good feel and take a bit of definite pressure to obtain a click. The 16 trigger pads are very responsive indeed (and have colour feedback to display strike velocity) plus they include aftertouch as well. Very nice. The 8 faders are long-travel and feel very smooth with just the right amount of resistance to imply quality. There’s 6 dedicated transport buttons for DAW and in-built sequencer control – I like this. My old MkII shared them with other functions so you had to be careful to be in the correct mode for them to work.
Pitch-bend and modulation wheels are smooth, and the pitch-bend is well-sprung and centers accurately. They have LED strips that brighten as you turn them, and change colour to match the zones they are controlling.
The keyboard feels very good and it’s very fast and responsive. It apparently has a 10kHz scanning rate for the keyboard which is fast compared to most other keyboards. It certainly feels more responsive than some other controllers I’ve used. You have to press quite hard to get the aftertouch switching in though. You can set velocity curves for the keyboard. Overall layout of the controls is good for typical use between simultaneous playing on the keyboard with one hand and tweaking with the other hand, even though visually it feels a bit left-biased.
Connectivity. When you plug the keyboard into your computer via the USB cable, and then open a browser window to the Novation website (not on Firefox – but Chrome works fine), and then log-in, it can communicate directly to the keyboard. This is like magic to me. They call this area of their site Components and it’s like a library of templates and configurations you can send and receive from the keyboard. You can also update the firmware directly from the web page, so I did this first. It was almost too easy compared to the usual fiddling with USB sticks and the like. In this Components area you can build your own custom configurations and re-map every hardware control on the keyboard if you wish. There are also many ready-made templates for hardware synths. You can even calibrate your pitch-bend and modulation wheels online.
The keyboard integrates quite closely with a couple of DAWs – Ableton Live is the deepest I think, followed by Logic Pro X. Other DAWs have various levels of integration, or at the least just the Mackie HUI and controller connections. My main DAW is Logic Pro X, and with the latest v10.5.1 update I was hoping that the Novation pads would easily trigger the new Live Loops, with integration similar to triggering Ableton clips. Unfortunately not yet. I’m guessing it’s too soon, so it will be interesting to see if and how quickly Novation adds additional implementation for this.
With Logic Pro X, you need to install a Novation’s control surface plugin to get full implementation. This replaces the old AutoMap Server app which was finicky and personally caused me all sorts of issues over the years so it was nice to see something more graceful in place. Once i got the new Novation plugin successfully installed it seemed to work fine. It showed up in Logic’s Control Surface setup, and the transport controls and faders worked, but I still had to do a bit of troubleshooting to get the Novation TFTs displaying the correct Logic info – especially the Smart Controls. So I had to trash the old Logic Pro X control surface preferences and reinstall the plugin. No biggie. After that it worked like a dream. You just need to press the “In Control” button on the Novation to make it happen. Hardware-connectivity-wise, there’s pretty much everything you’d need on the back: Three MIDI DIN plugs: In, Out, and a selectable Out2/Thru. There are two sets of CV, Gate and Modulation outputs (configurable to 0-5v, or -5 to +5V) on 3.5mm jack sockets, and a single clock out. Three sets of ¼” pedal input sockets complete the array – with two being for Sustain and Expression pedals and the other one for Footswitch. And of course the USB 2.0 and power sockets.
Tidy back connectors
Sequencer: Although, as I mentioned, I didn’t really play with this function very much (despite it being a major selling-point), for the sake of completeness I should at least let you know what it does. There are 8 sequencer tracks (parts) that you can use to capture real-time or step-based MIDI performances on. For example, MIDI notes, with velocity and automation. You can have 8 patterns per part. There are 64 Sessions each containing 8 parts though – so that gives you plenty of scope for a live performance. You can have up to 32 steps per pattern and can edit the timing to a higher resolution within each step. There’s quantising and swing features. All assignable controls can be automated up to maximum of 8 at a time. You can chain patterns. On the down side, the 16 pads are not quite enough to visualise a full arrangement at any one time as they need to be banked, despite being able to “rotate” the pad display view vertically or horizontally. Oh and you can change direction of the patterns, or make them random. And you can shift a pattern left or right.
Scales: This is a pretty funky feature. You can apply one of 16 selectable scale types to the keyboard and then choose whether to just display it via the little key LEDs, or snap non-scale notes to the nearest scale note, or just ignore (mute) them.
Zones: You can split the keyboard into up to 8 different zones (they can overlap as well) with a different MIDI output channel or sequencer track. Each is lit with a different colour on the key LEDs. You can map the Pitch-bend and Modulation wheels to any zone and they will also match the LED colour of that zone.
Arpeggiators: One arpeggiator per sequencer track. There are some interesting features available for this. Unlike a regular arpeggiator, you can customise the played notes in the arpeggio by turning them on or off via the pads. There are the usual features as well, arp type, direction, sync rate, length etc. Quite nice.
Using the features. I always like to see how intuitive the setup is to use by just having a play. To be honest I struggled a bit – I could see there were buttons labeled eg Zones, Sequencer, Scales and Arp, but pressing them doesn’t necessarily activate those features. It often just allows you to edit the settings for that feature. You have to actually hold the “Shift” button and press one of the other buttons to do that. Most systems would flip it the other way around. But it all works well once you get your head around the architecture of the system, and is not as tricky as it seems after a little use. I never got to try the CV outs at all, and barely touched the inbuilt sequencer or arpeggiators as I use a DAW for that – but I’d like to play with them more – the additional features look great. There’s a bunch of good videos on the Novation site for these features if you want to know more about them.
Live performance. I decided to use the keyboard for an upcoming post-Covid19 Lockdown gig using Apple’s MainStage. Due to the short preparation time, I only used the basic features of the Novation (mapped controls and keyboard splits) but it was certainly impressive on stage, both in look and feel. The keyboard LEDs provided sufficient light to be able to see what I was playing despite the very low-light conditions – and those of you who have performed live on-stage will know how dark it gets when the lights are turned off on stage!Apart from the keyboard I only mapped the faders and a few of the buttons, so it was easy enough to find them.And the solidity and grip of the keyboard made it a pleasure to play live.
Positives:
The built-in sequencer and arpeggiators are fantastic.
Scales mode is cool.
Excellent colour-indicated keyboard split zones.
Lights! Lights everywhere!
The pads are beautifully sensitive.
Dual CV outs for the hardware junkies.
All the MIDI options – full set of DIN plugs plus USB.
Good-feeling responsive keyboard.
Works extremely well with Ableton and Logic as a control surface and still quite good with other DAWs through the Mackie HUI mode.
Good web-based system for updating firmware and customising sessions and patterns etc.
Negatives.
I miss having LED rings under the knobs.
I wish you could program your own custom scales.
Not USB-powered (unsurprisingly).
Not quite enough pads to easily navigate an entire Sequencer arrangement.
Summary. Although at first glance it doesn’t stand out that much from the current range of keyboards, mostly by being standard matt-black, this MIDI keyboard controller is a monster. One of the advantages to developing newer versions of a product is that it’s a chance to optimise, and they certainly have with this one. They’ve kept all the good stuff and added to it, and dropped the less-used features. It’s got almost everything you could possibly need and more – and they keep adding and refining features via the fairly regular firmware updates – in fact they recently increased the single arpeggiator to one per each of the 8 sequencer tracks, and also increased the quantisation resolution of the sequencer. In this price point you’ll see a lot of features that are missing from other brands – like the full set of hardware plugs and aftertouch. Novation have really established themselves as one of the better brands by not cheaping-out and dropping quality. I loved this keyboard so much I actually bought the review model. This is an excellent keyboard controller for those who want both quality and features without selling the house, in a gig-ready box. Recommended.
Everybody seems to be adding some cool plugins to their mix bus nowadays. They’re usually some sort of blend of EQ and mix-glue compression.
But there are some other interesting and useful plugins available now that are less about sound and more about utility.
Some of them are even free!
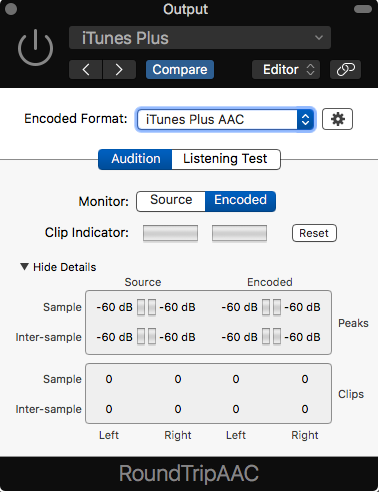
Apple – iTunes Round Trip AAC
This is a free Apple-only plugin that allows you to check what your AAC bounce will sound like in real-time. For those of you who still think AAC is an Apple format – check out this article. AAC will eat mp3 for breakfast. The plugin allows blind-testing as well.
iTunes Round Trip AAC plugin
You can get it as part of the free “Mastered for iTunes” resources from Apple. The pack also gives you some other cool tools.
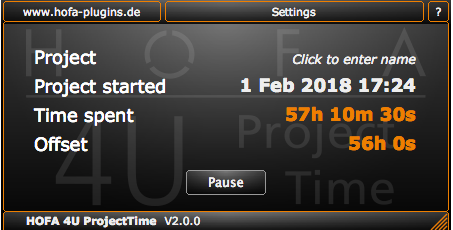
HOFA – 4U ProjectTime
For those of us that need to track how long we’re spending on someone’s project, this cool little plugin basically just counts the time that the project is open. You can pause it for breaks, and if you didn’t have it before the project started, you can add a time offset, although you can’t change the date/time when the project was started, so it keeps you honest. You can even export a log and add comments. Windows and Mac.
This plugin is for tracking your song’s metadata. Sounds riveting eh? Metahdataaaaahhh. I always hear that in a robotic voice. Actually this is way more important than you’d think. One of the latest problems with streaming and downloading music is actually figuring out where the money goes. So in this plugin you enter details about who worked on each track. For each member of the team – whether it be artist, engineer or producer (and others) you can track who did what, the shares each have in the music, their role, their performing rights organization, contact details, and the song’s ISRC code amongst other stuff. It can also save individual profiles to make entering data easier. As the track moves down the production chain this data can go with it. There’s a free plugin and a more enhanced paid version that can do PDF reports and embedding into audio files and cool stuff like that.
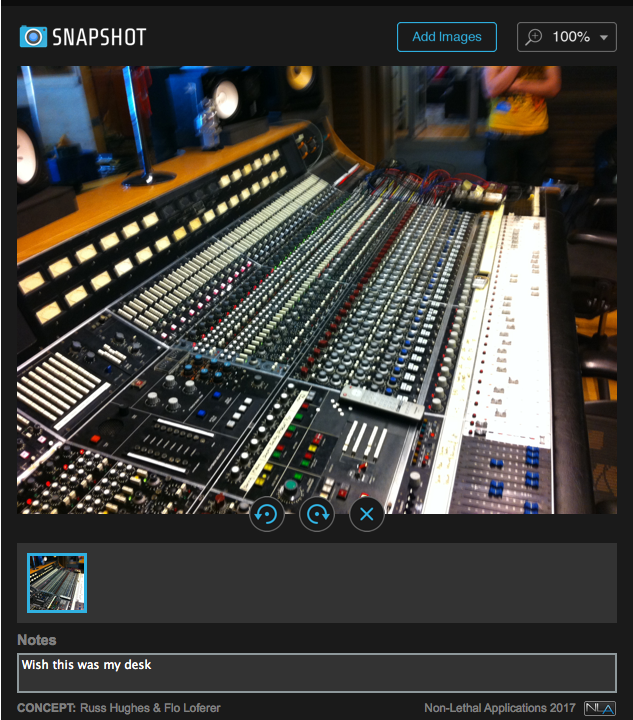
This is a free Mac and PC plugin for storing images in a DAW. Whether it be photos of a drum mic setup or the position of the knobs on an equipment rack or a mixing desk it’s pretty darn useful.
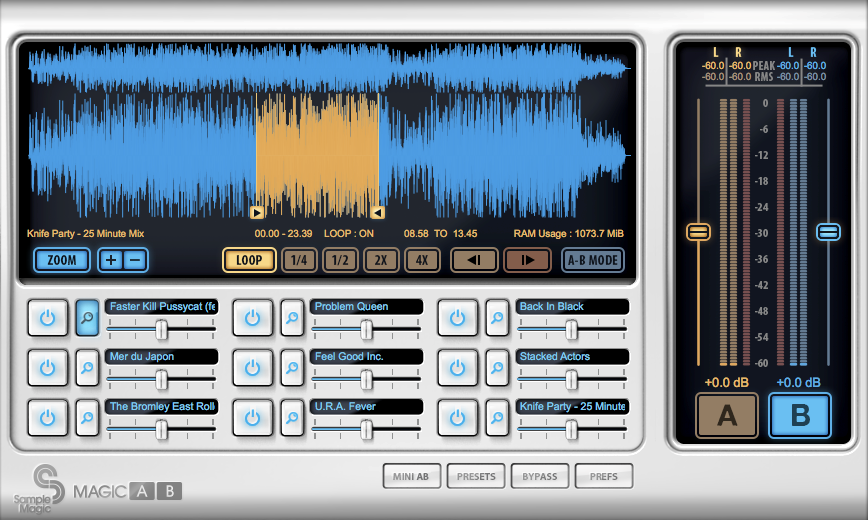
This plugin’s a little more pricey but still really useful. It’s been around for a while and is now up to version 2. You can load up to 9 reference tracks and then A/B them against what’s playing though your master bus. It allows level compensation for each reference and can handle sample rate and file type differences easily. It has metering and can be controlled via MIDI. Very handy. You can also loop sections of your loaded tracks and save presets of various references. $60USD.
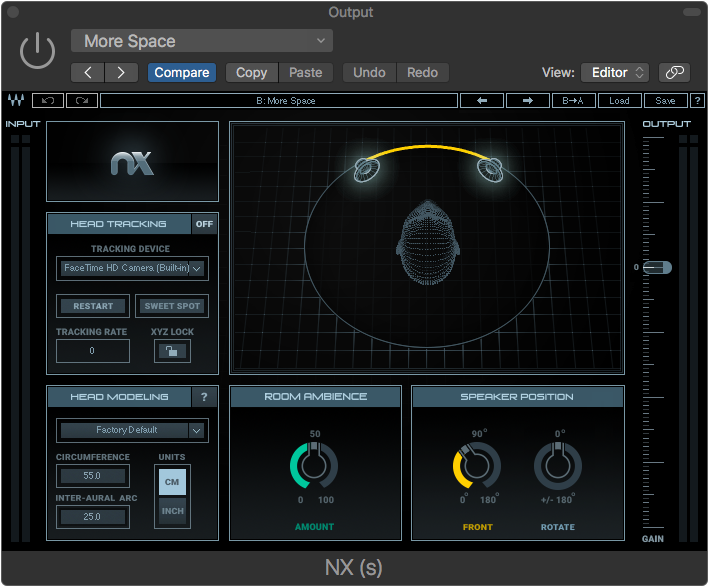
This cool plugin emulates various studio monitoring environments through a set of headphones. It’s basically a binaural room simulator, but it does a lot more than that. There’s a few of these products around now, but this one seems to work pretty well (Toneboosters TB Isone is also pretty good and comes in an inexpensive bundle), plus it can use a video camera for head-tracking, although I don’t bother with that.
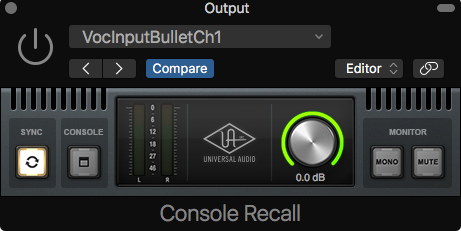
This is a handy specialised plugin for controlling and saving the settings for a UAD Console setup, which you can imagine is pretty handy when coming back to previous projects and wanting to carry on recording. As a bonus it controls the master volume, and has mono and mute buttons for the master out.
Universal Audio Console Recall plugin
It comes free as part of the UAD software package, but I’m mentioning it here as some UAD owners have no idea it even exists.
This Universal Audio audio interface looks like a basic entry-level mobile (or leave it in the studio) interface with pro quality audio conversion and a couple of cool features.
I love that it’s bus-powered because I hate hauling and plugging-in extra power packs, especially if I’m using my laptop outside of the studio.
It has a single UAD processor – enough to run the bundled low-latency UA 610-B Tube Unison preamp and Marshall Plexi guitar amp plus the other basic bundled plugin essentials. It will, of course, be able to run any of the other UAD-2 plugins as well, but having only a single processing chip (they call it a UAD-2 SOLO Core processor) is a wee bit of a limitation in this regard.
With some care and by removing any Unison preamp/amp plugins when they’re not being used, you could still enough power to run some other UAD plugins for mixing or mastering.
The hardware is quite minimal – only two combo (XLR or 1/4″ Jack) inputs and two 1/4″ jack outputs on the back – plus an instrument in (1/4″Jack) and headphone out on the front. Just the essentials really.
On the top is a display, eight buttons and a knob to access the input and monitoring features.
At around $499 USD ($899 NZD at the Rockshop in New Zealand) it’s a great deal for a Thunderbolt 3 bus-powered interface with included Unison preamps and some UAD plugin hosting functionality.
My last experiment with building a MIDI controller, about a year ago, was to see if there’s any benefit in using larger knobs for MIDI controllers.
I’ve always hated those tiny little plasticy cheap-feeling knobs packed close together that seem to be used on most MIDI controllers. I’ve found that depending on where you’re sitting or standing, it sometimes takes two grabs to make a complete revolution on them, with a pause in the middle, and it’s difficult not to bump the surrounding knobs as well. It can make for some frustrating moments when you’re trying to map each control to something in your DAW.
Plus smaller knobs give poor resolution and positional feedback to the user when turning, compared to larger ones. I also can’t help but feel that those huge vintage-looking knobs add part of the charm to vintage audio equipment.
So I bought the largest knobs I could find at Jaycar Electronics (did you know knobs are surprisingly expensive!) and made up a panel of 8 of them, using a Livid Instruments Brain V2.
The first MIDI controller I built
It was pretty good actually – those huge knobs gave a silky-smooth and super-accurate response when controlling parameters in Logic Pro X.
So I worked with it for a while, but to be honest they were almost a little TOO large, and I wanted a couple more of them on the panel to get more convenient mapping to Logic’s Smart Controls. Additionally, I wanted some buttons on there for triggering drums and sampler sounds, plus a few old-school toggle switches just in case.
So – off to Jaycar once more to buy another load of second-to-largest knobs in stock and few other components that I needed for it. In the end I ordered a pre-assembled RGB Button-Pad from Livid – they were on sale that week and I couldn’t be bothered fiddling around too much constructing my own from scratch.
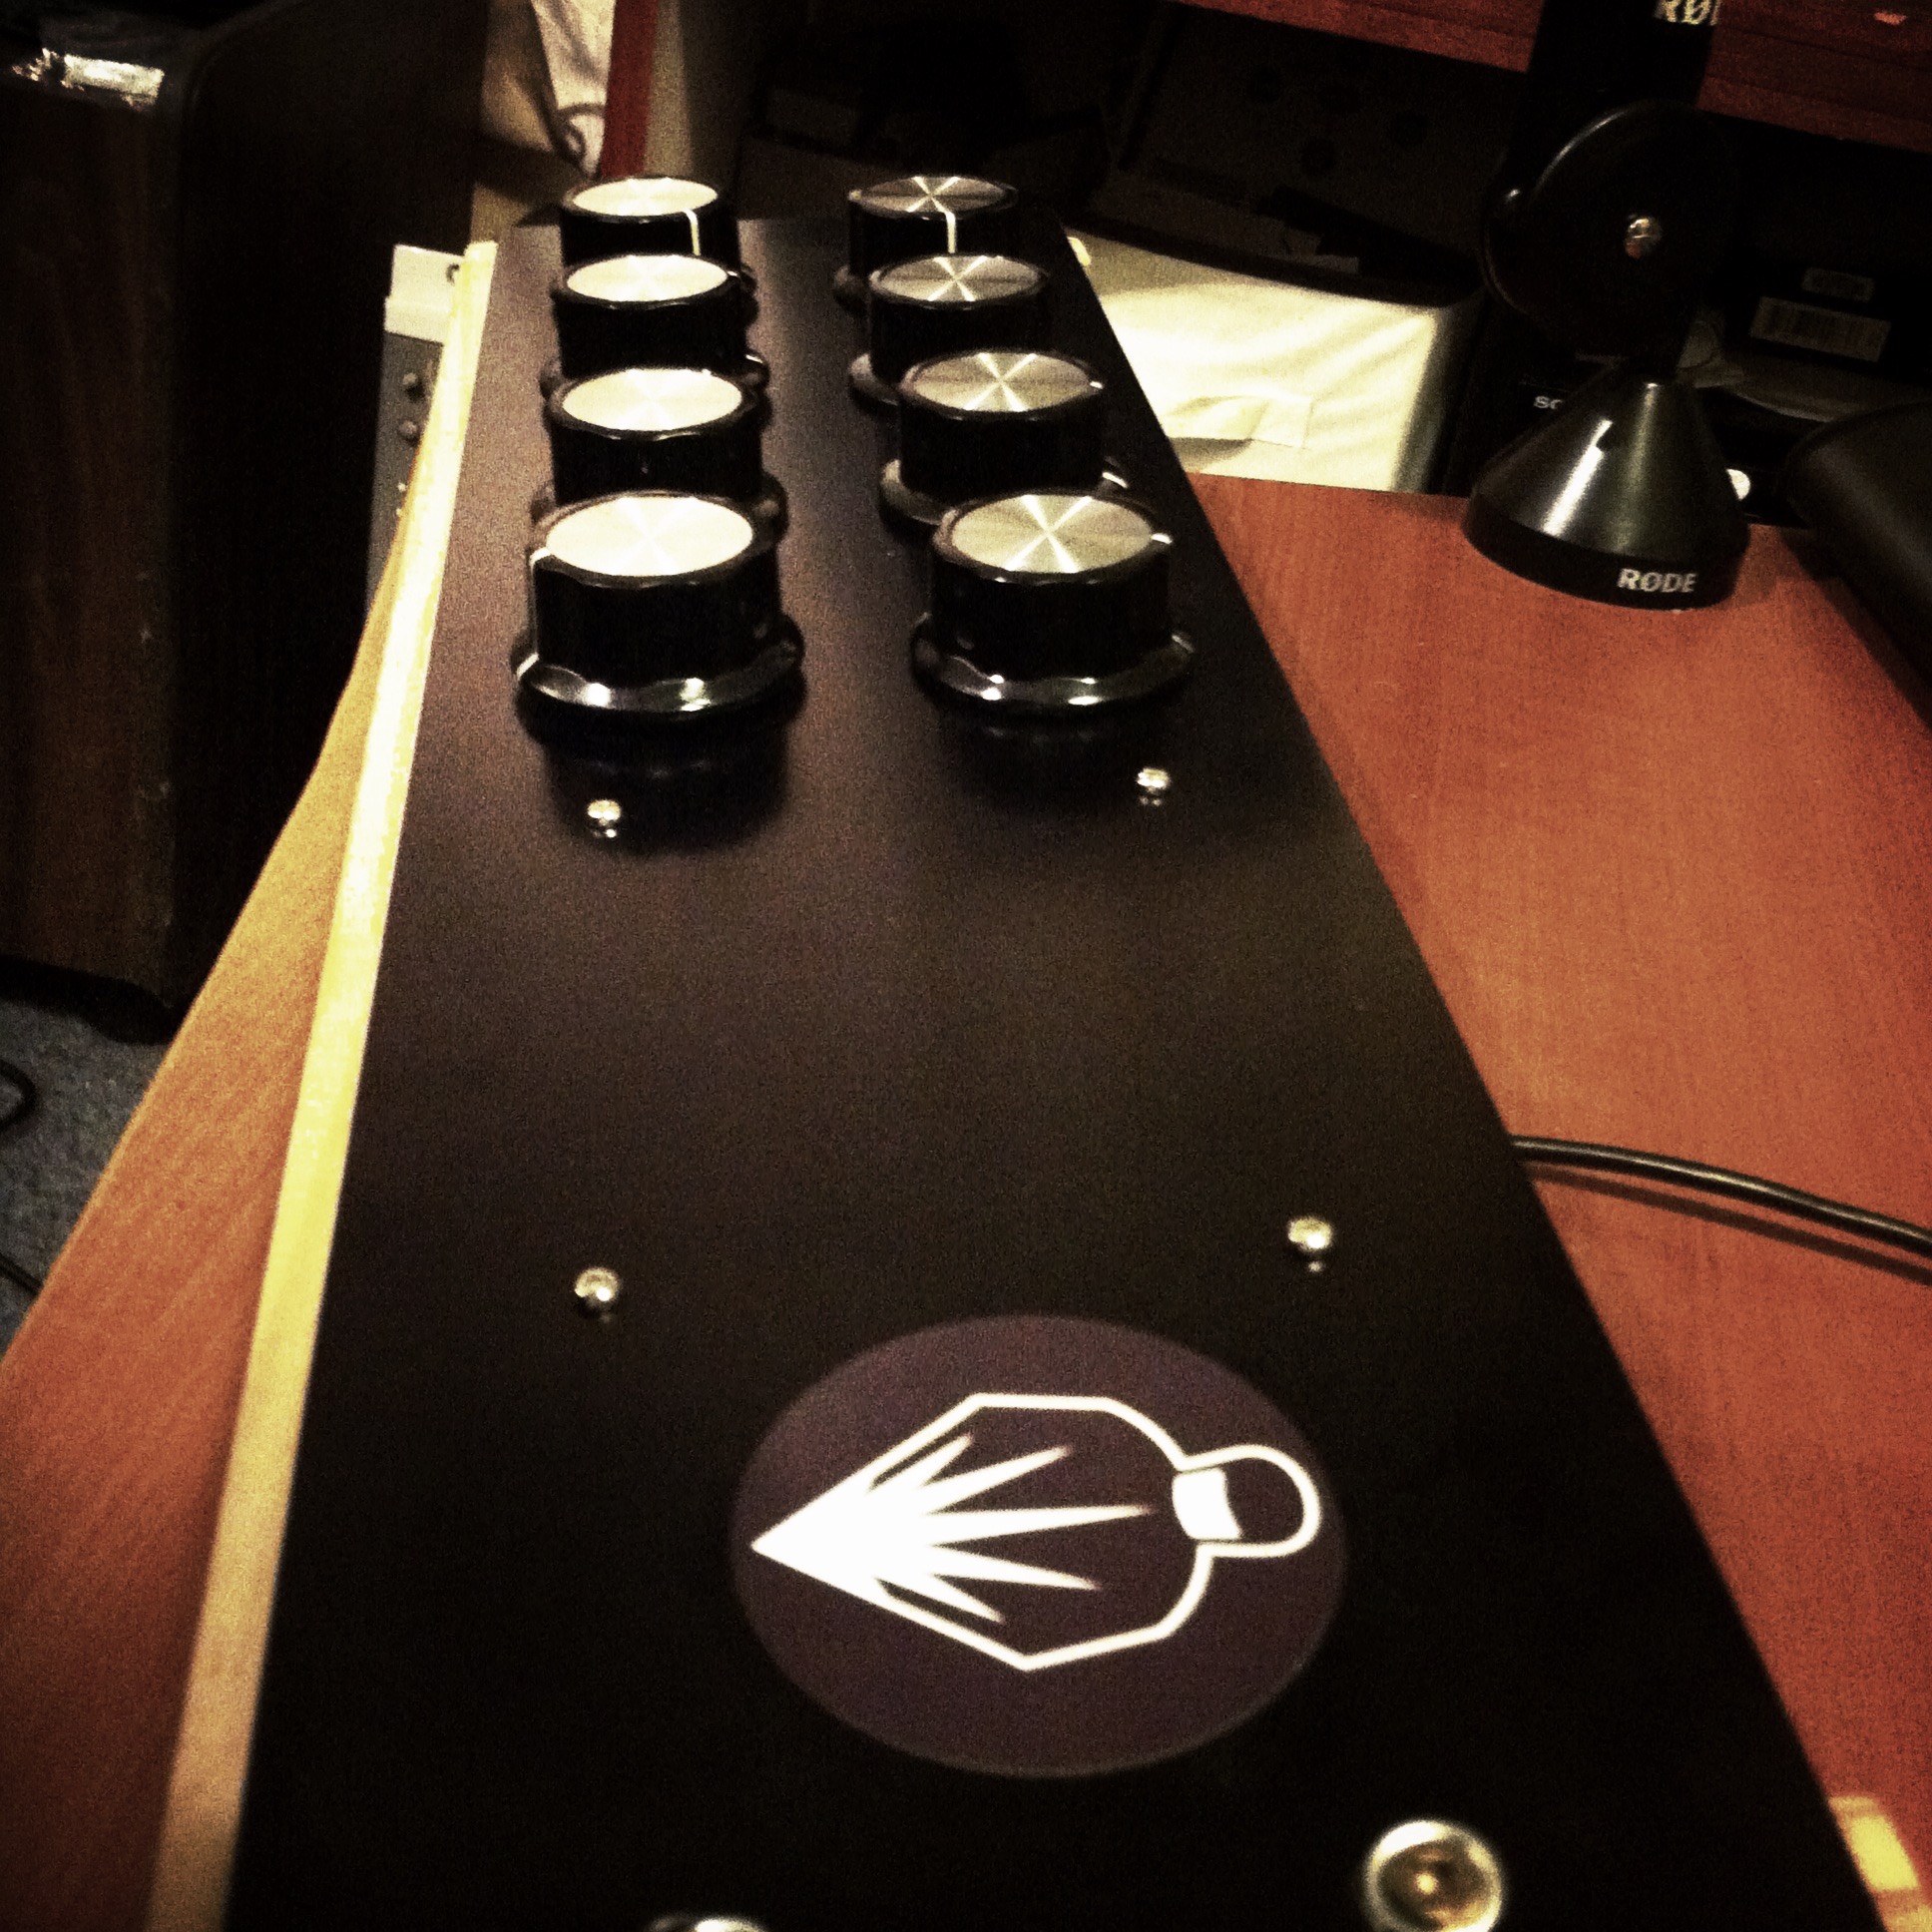
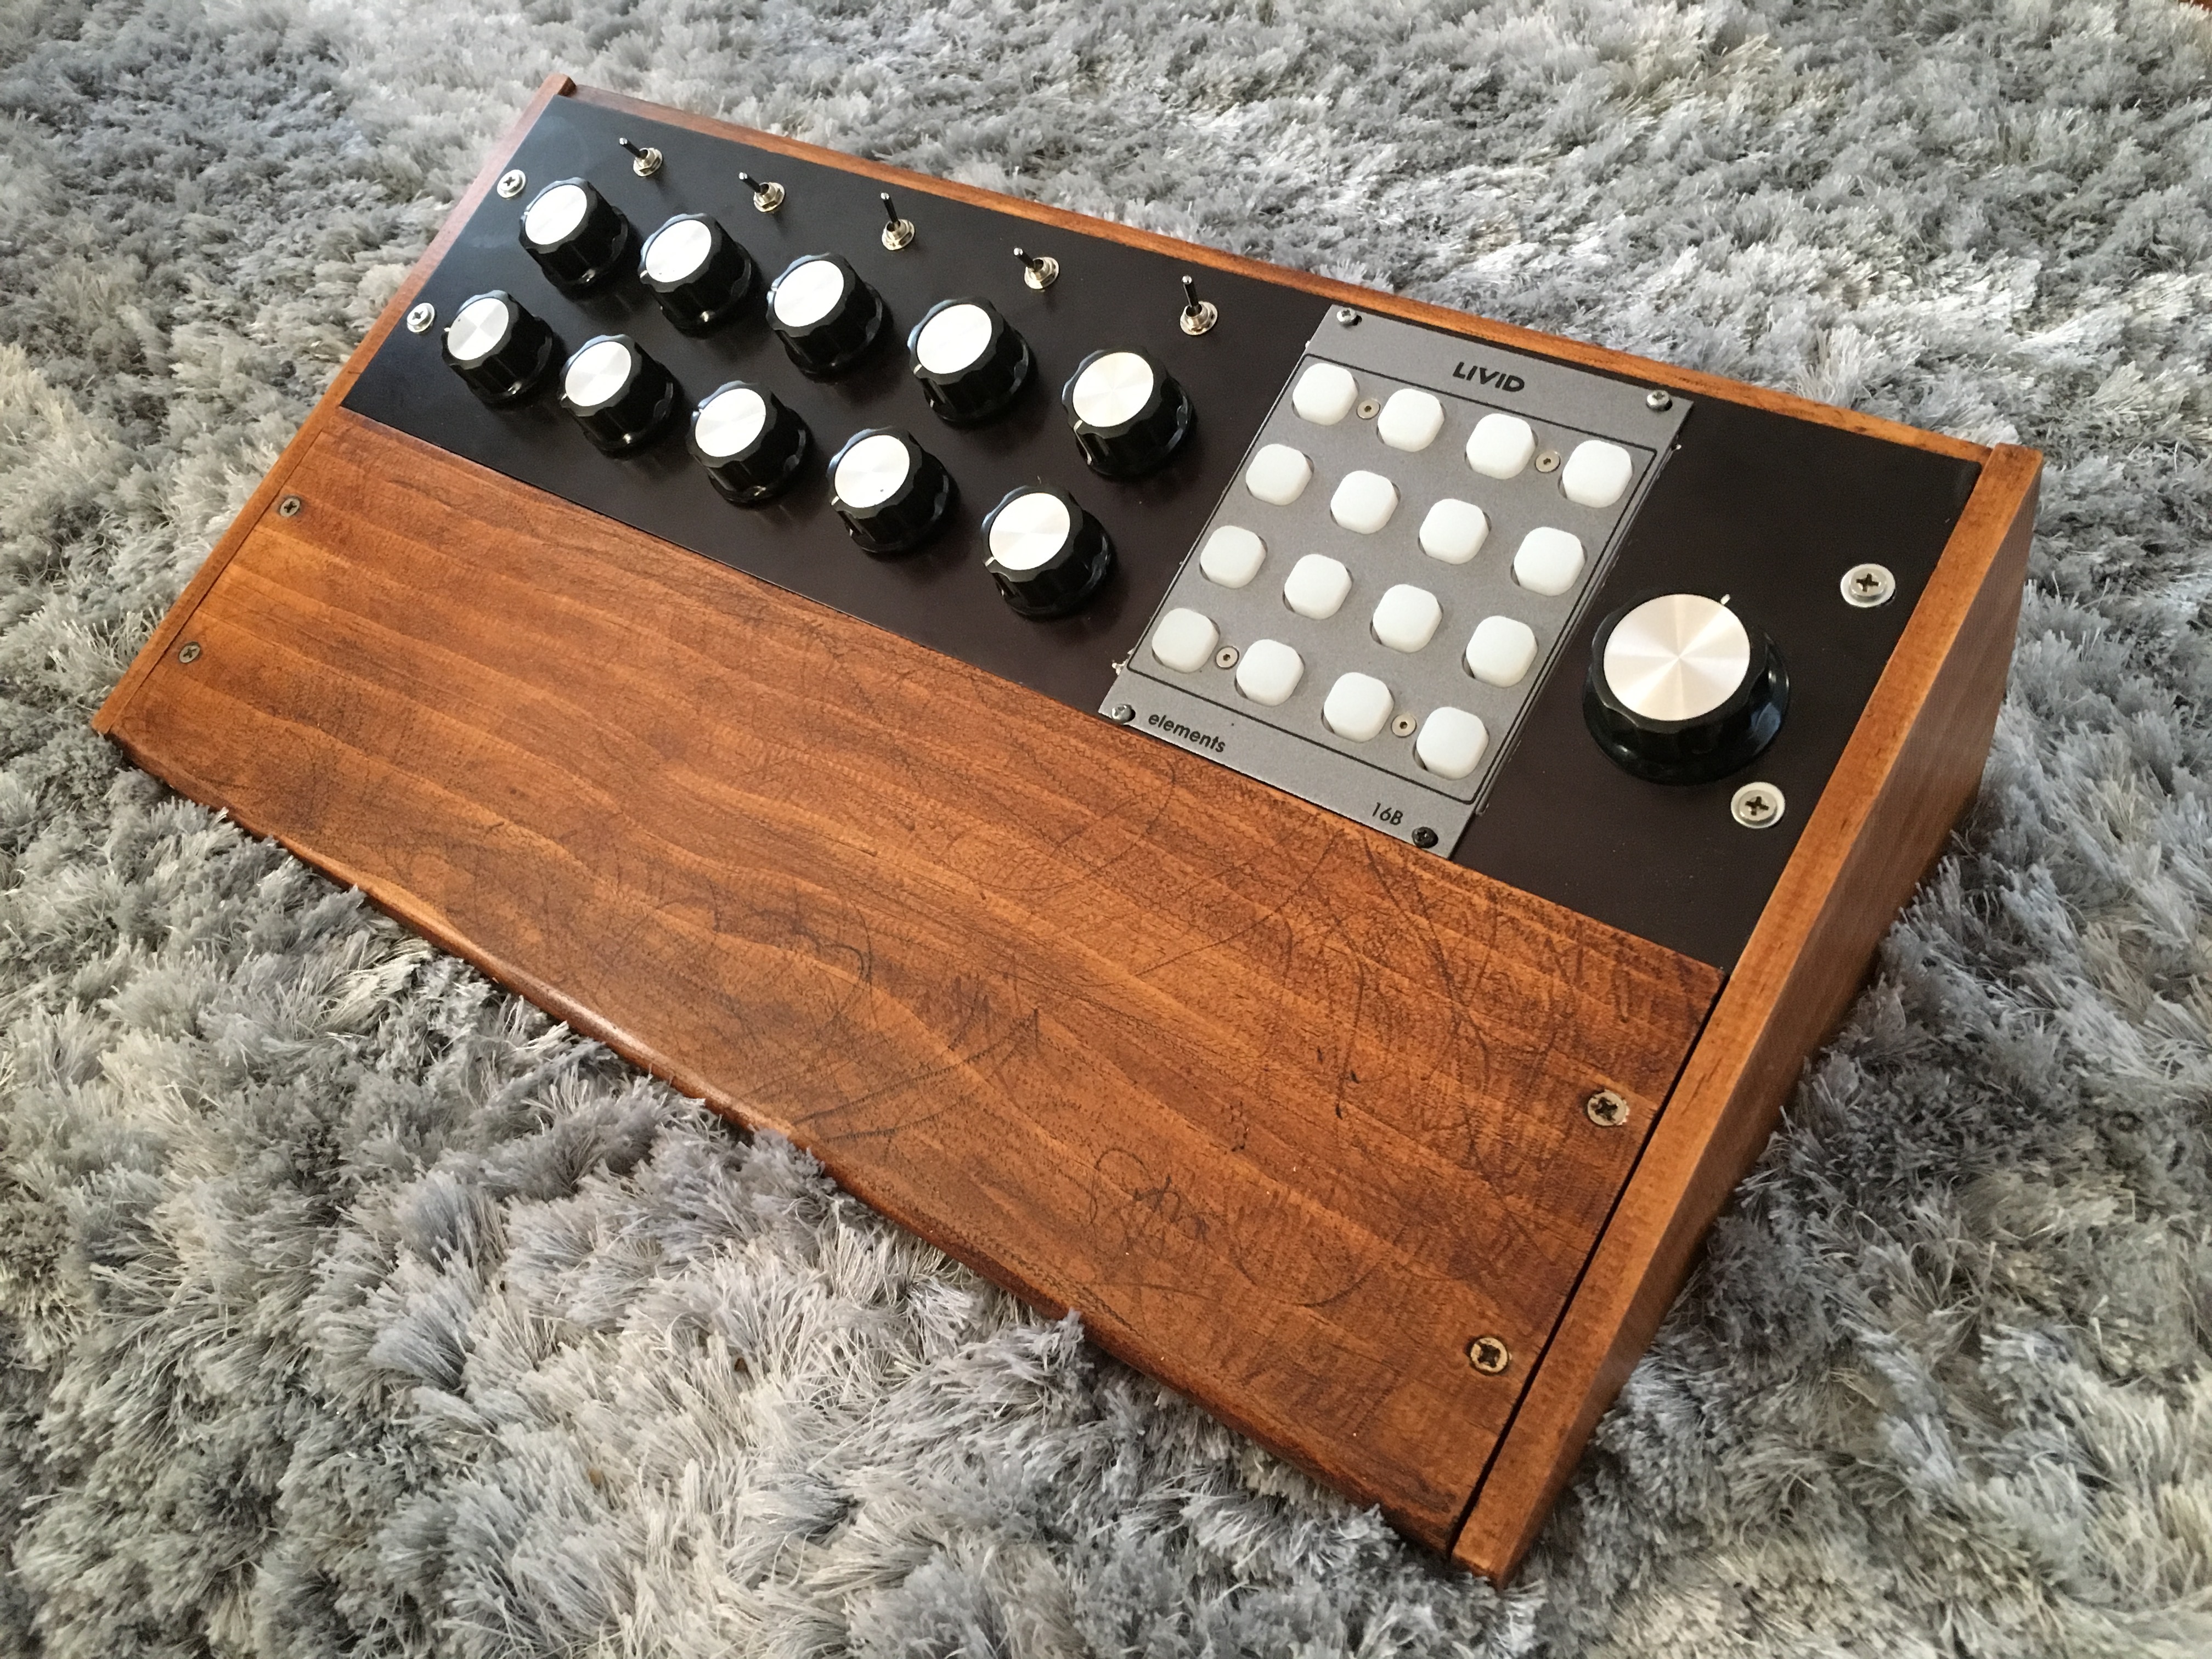
So my second version of the MIDI controller came together. I also decided to retain a single large knob on the right of the unit for Logic’s Automation Quick Access (AQA) function – basically for recording and editing automation in my tracks.
Here’s the second prototype:
The second MIDI controller I built.
I also put together a more vintage-looking wooden surround for it. As you can see I went for a vintage “distressed” look. Actually – this was only semi-deliberate, since I was missing some essential metal-and-woodworking tools in my workshop. Apparently the Renovation Tool is NOT perfect for everything.
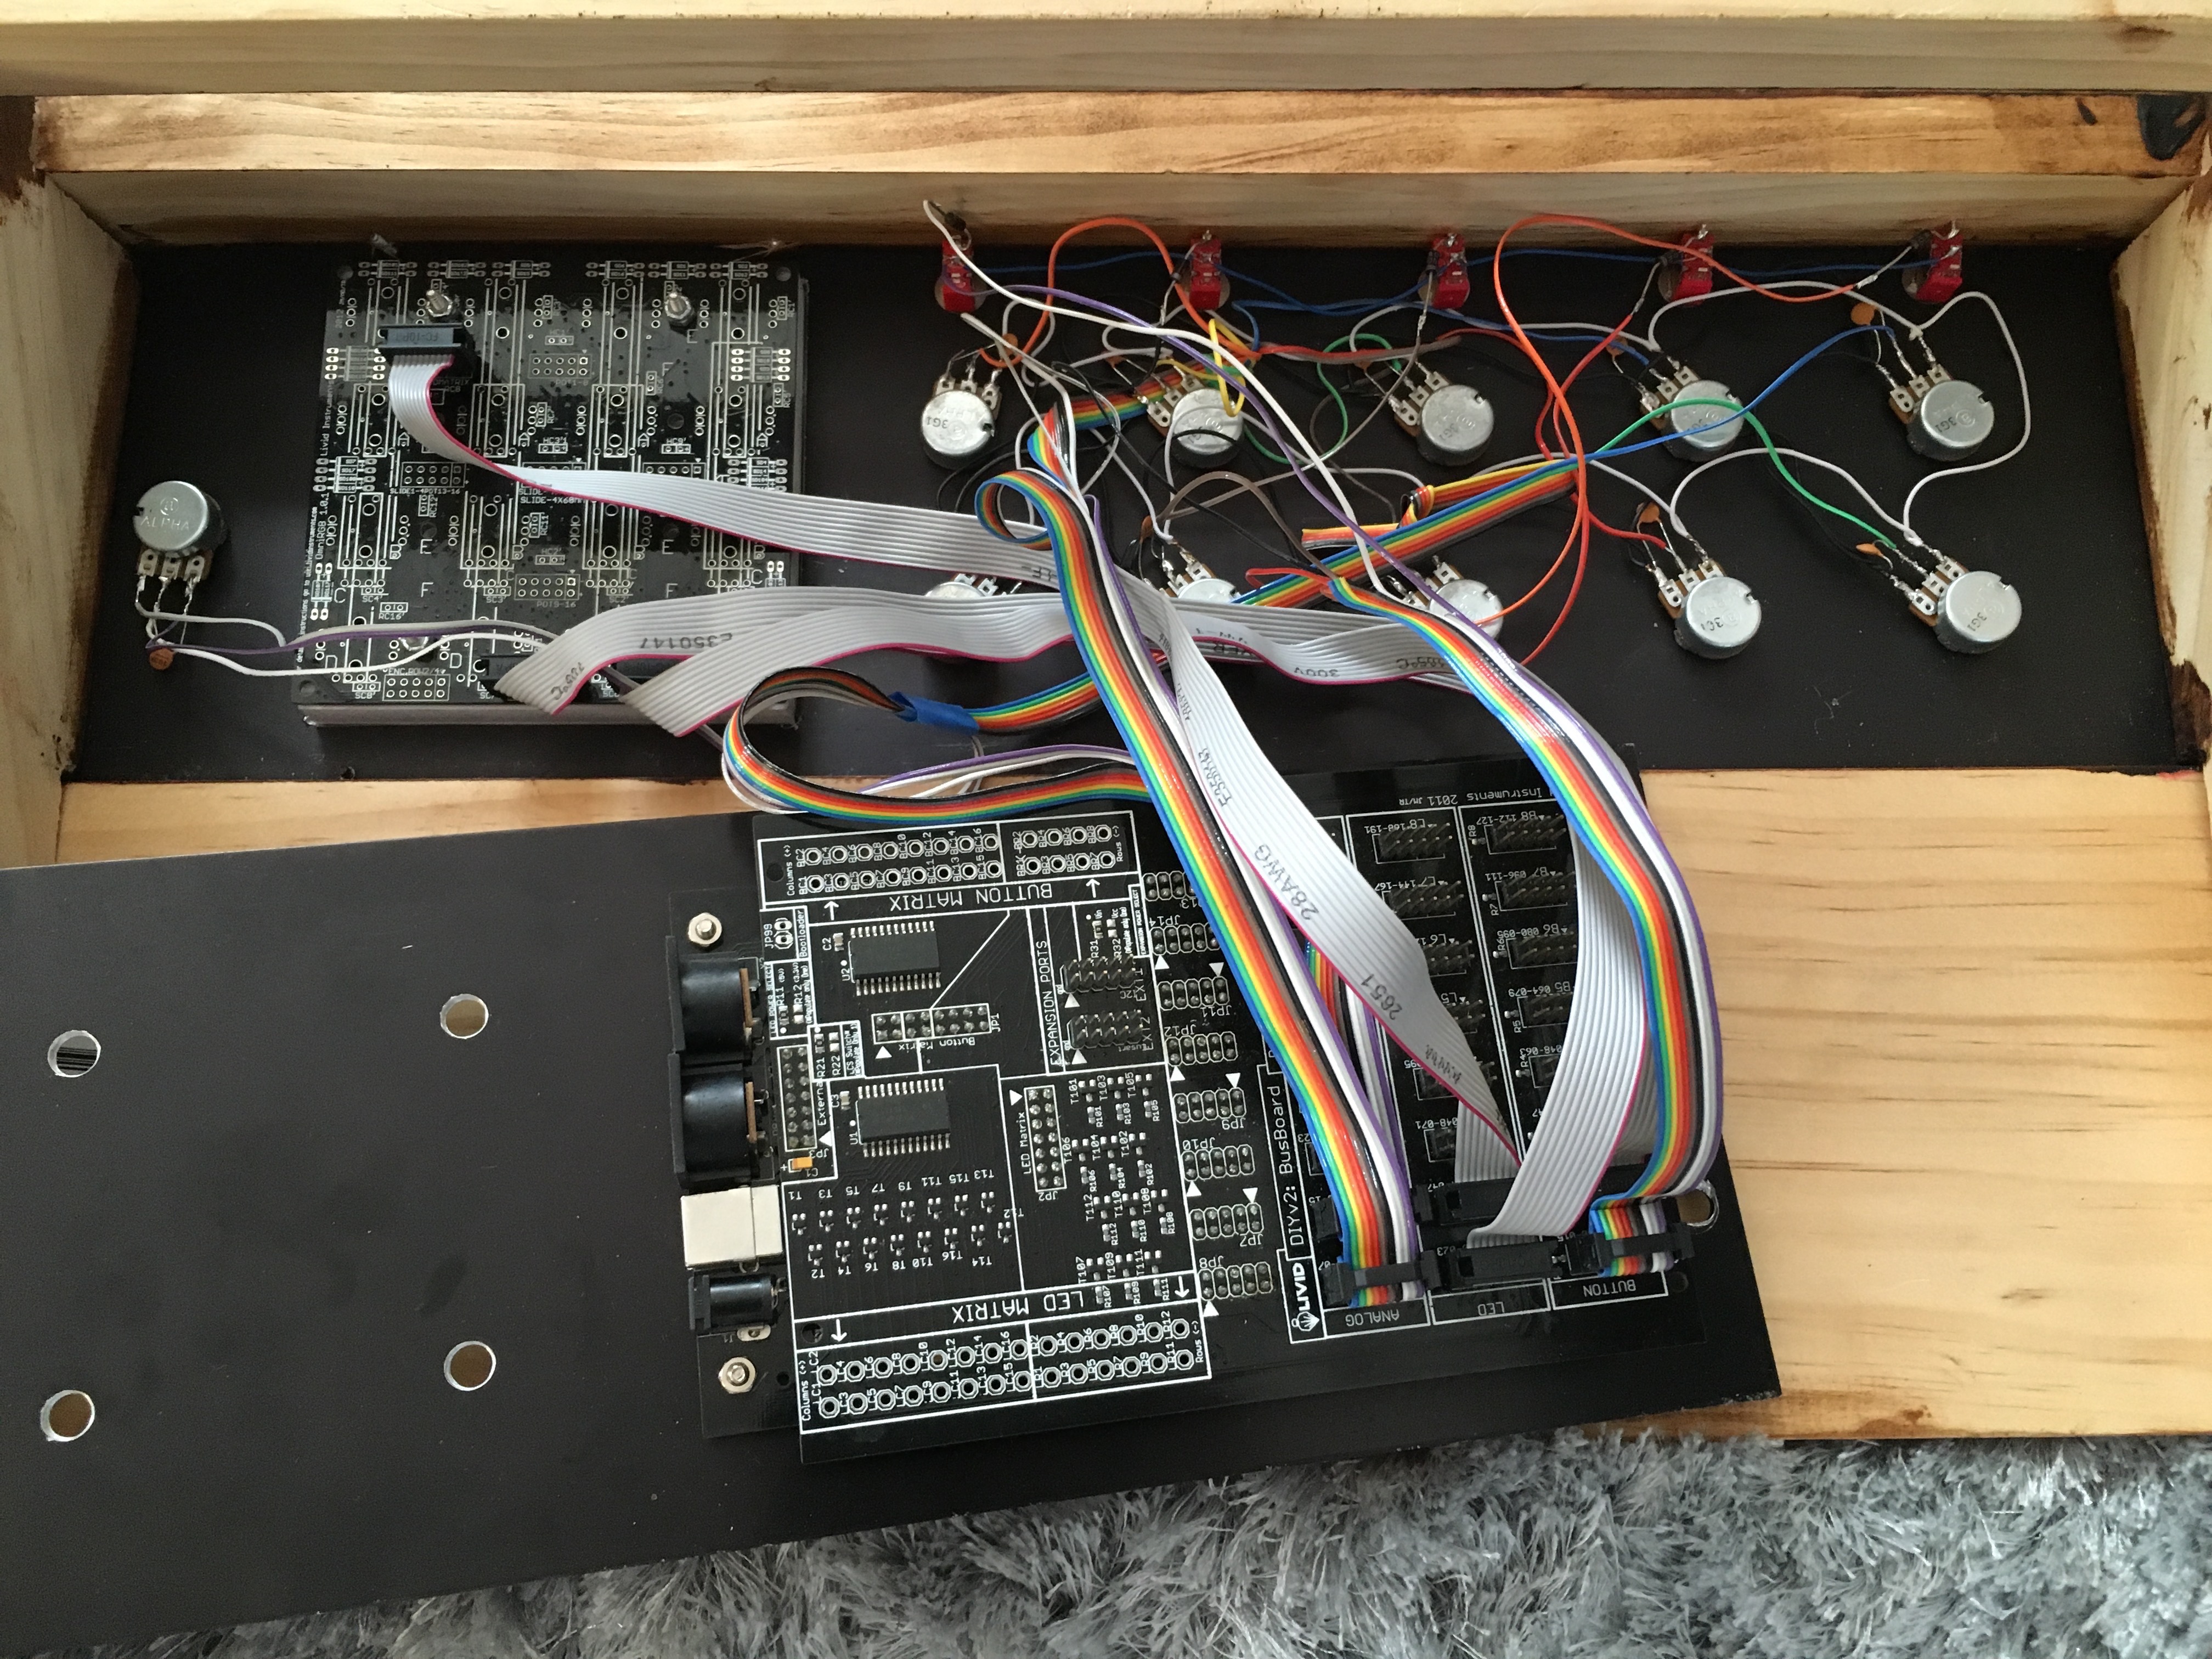
The wiring was relatively simple, although it looks suitably impressive in the photos.
Here’s what it looks like under the hood
There was a bit of soldering involved of course, but each pot can be re-mapped to a different MIDI controller number via Livid’s Brain Configure tool if necessary. In my case it was, as I had plugged the ribbon cable headers in the wrong order in my excitement to try it out. It was much simpler and faster (a few seconds) to remap them in my studio than to remove the unit , open it up and then switch the plugs.
Despite the rough edges, the constructed unit is good enough to get an idea of how the final unit will be constructed, and everything works fine. It looks great in my home studio and it adds a nice degree of analogue vibe even though it’s digital.
My next goal is to get hold of some decent woodworking tools to make a tidier version of the case, and maybe brand my own logo on there somewhere.
One of the cool tricks you can do with Logic’s Drummer regions is to drag out an alias of the Drummer region to another software instrument track. (Drag a Drummer region with mouse while holding Shift-Option).
Aliases are virtual regions with no content of their own – they just follow another region’s content (although you can still do stuff to them like transpose them etc).
Shift-Option drag Drummer region to create an alias
This new software instrument track can be another Drum Kit instrument, or a Drum Machine, sampler or even a third-party drum instrument like Slate’s SSD drum sampler.
Now your new instrument track (via the alias) will play exactly the same thing as the Drummer pattern. Even if you go back and tweak Drummer the alias will still follow it. And if you mute the Drummer region, the alias still works, and you will continue to hear the Drummer pattern through your new drum instrument.
That’s pretty cool, but what if you don’t want to layer the entire kit – perhaps just the kick or the snare?
That’s easily done too;
On the new alias instrument track, go to its Track Inspector pane. It’s the second box down in the Inspector window on the left. It’s usually hidden, so you might have to click the little disclosure triangle to pop it down.
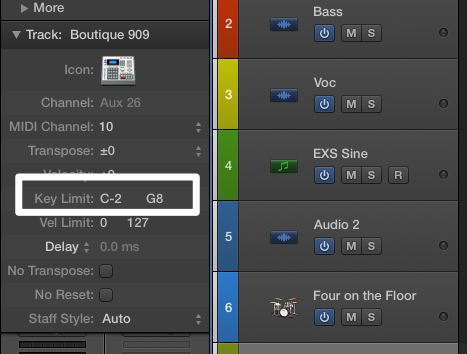
Now you should see a “Key Limit” line, with something like “C-2 G8” in it. These are the low and high key limits, and it means that this track will currently accept MIDI notes over the full range of possible MIDI notes from C-2 up to G8.
Set the track’s Key Limit range down to a single note – eg C1 for Kick drum, or D1 for Snare
If you only want to trigger the kick, double click the “C-2 G8” and type in “C1”. You should see two C1’s – meaning only this one MIDI note will now be accepted. You should only hear the kick drum.
And if you want a layered snare as well?
With the same instrument; Create another Virtual Track going to the same instrument; Menu: Track/Other/New with Same Channel
Drag a copy of the alias to this track. (Option-drag alias with mouse)
On this track, double click the Key Limit numbers and type in “D1”. This will now only accept the snare MIDI note.
With another instrument; Create another software instrument track and dial up a drum patch.
Drag a copy of the alias to this track. (Option-drag with mouse)
On this track, double click the Key Limit numbers and type in “D1”. This will now only accept the snare MIDI note.
As you’ve probably figured out by now, you can carry on and layer as many extra kicks and snares on different drum instruments as you feel like.
Bonus tip for handy kick and snare layers:
Load up an instance of an EXS24 in a new instrument track. (In the Patch Library select Legacy/Logic/Logic Instruments/EXS24)
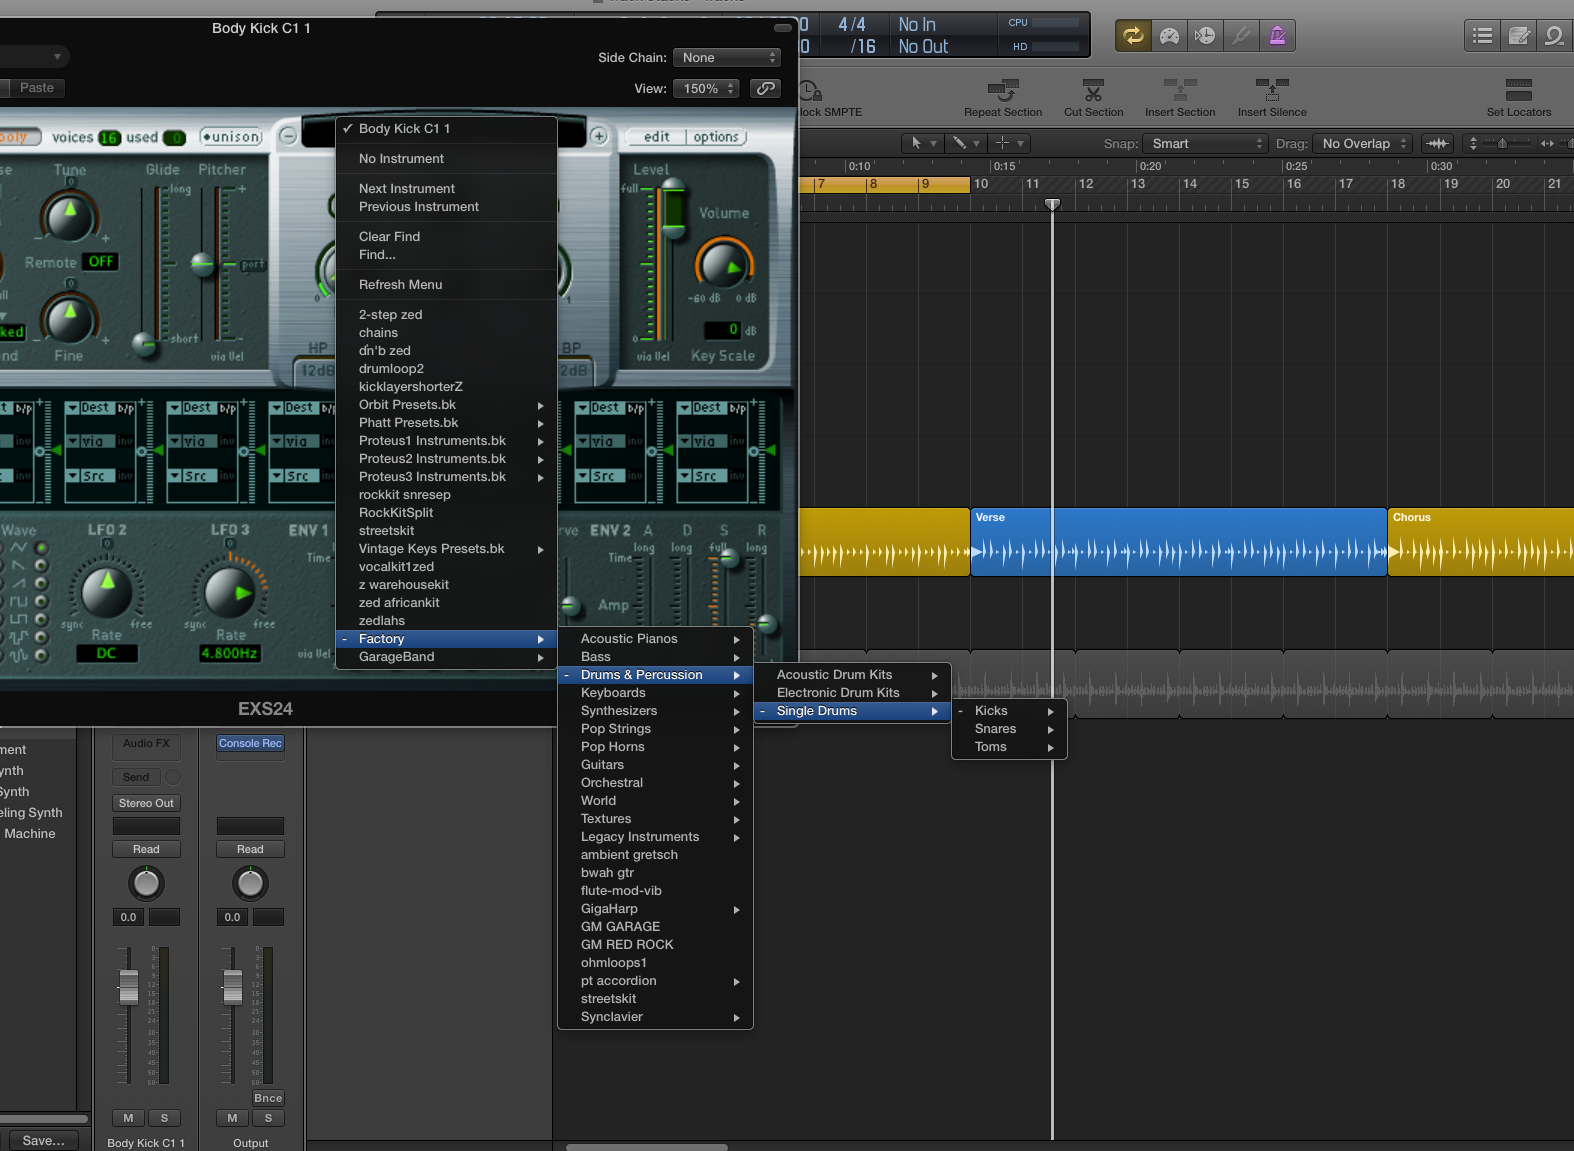
Click the EXS24 slot on the channel strip to open the EXS24 front panel up.
EXS24 Kick Drum Layer Samples
In the little panel above the Cutoff Knob, click and select Factory/Drums & Percussion/Single Drums/Kicks/Layer Kicks/Body Kick C1 1. If you click the little “+” symbol to the right of the panel you can step through each sample in turn.
As you can see there’s a whole bunch of “body” and “transient” kicks (and snares) that can be used to layer your existing kicks (and snares). Some of these sound great, although the “body” kicks sound unusual by themselves as they’ve had the transient part trimmed off the front.
Drag your Drummer alias onto one of these EXS24 tracks and set the Key Limits for the track as explained above and you’re away laughing.
My glory years of audio engineering were right at that transition between analogue and digital formats. My battles seemed to be between the harsh discipline of digital and the casual looseness of analogue. I became a bit of a cultist in league of getting that “analogue sound” on digital gear. And the trouble with cults, of course, is that you stop questioning things.
In my case I became so fixated upon just keeping my recording levels down (firm look/which is generally a good thing by the way! /firm look), that I forgot that with analogue-modeled plugins, overloading the input is the same as overloading the analogue unit itself. That means if you drive it hard, that instead of the usual shitty digital clipping events, you get a nice analogue harmonic-related distortion. Which means “musically-related” and pleasant. Anyone who’s ever seen a true analogue-based recording session (ie on actual tape) knows that those tape-recorder VU meters are usually pinned to the top. For some reason, our ears love the sound of harmonic distortion added to the original signal. It sounds more exciting and vibrant, while at the same time smooth and mellow. I think we will all agree that this can only be the perfect combination of anything.
So, as you’ve probably guessed, I was holding back from driving the inputs of my “analogue” digital plug-ins, as I had trained myself to avoid digital clipping. And this led to a pretty average impression of many of the cool UAD analogue-modeled plugins I had. Sure, they still sounded better than the average “digital” plug-in – but it was often subtle – just a hint of smooth silky velvet and random pleasant “character”.
Then I tried out the new Manley Variable Mu Limiter Compressor. I don’t know about you, but I can’t help but feel that there’s something inherently cool about the word “Mu”. Especially “Variable Mu”. Brrrr.
So I dialled up a few Manley (Variable Mu – sorry just had to say it again) patches here and there – “yeah I can hear it working – nice… nice”. Dialled up the patch “GG-The Fast Tickle”. Yeah beauty… nice. Then out of some crazy impulse (yeah I’m like that – completely unpredictable), I wind the HELL out of that input knob. I know – radical right? But, you know, I finally got the hug (well the song did) that EveAnna Manley promised us with this unit. It really does just grab everything and bring it together like a big group hug. I don’t know about you, but that sounds… awesome.
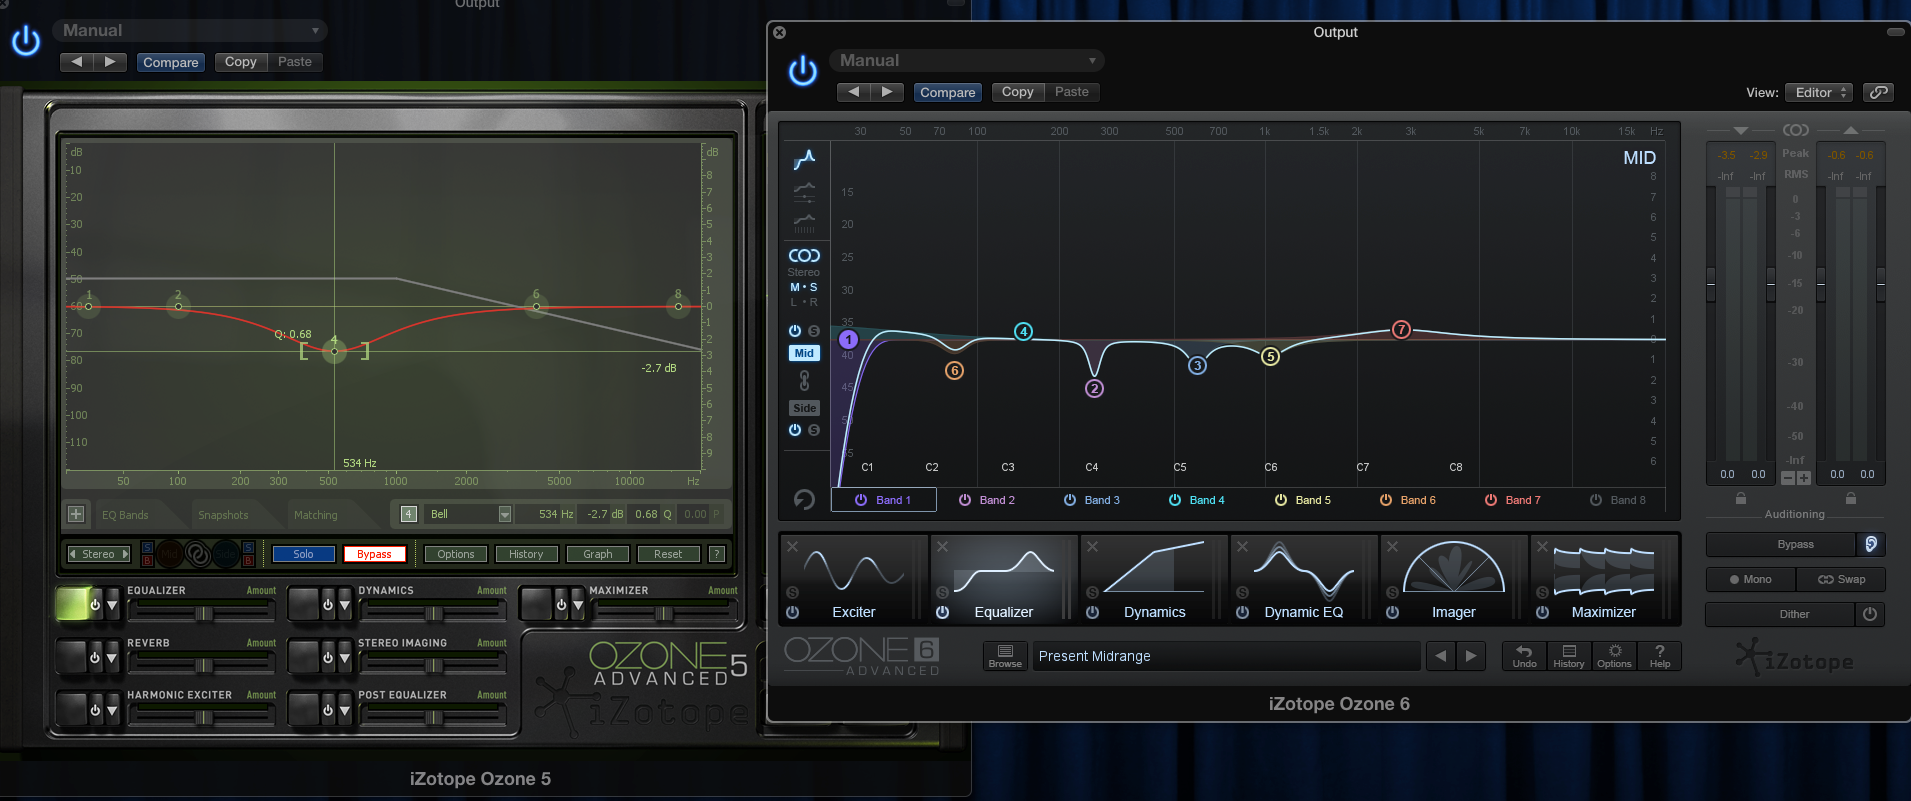
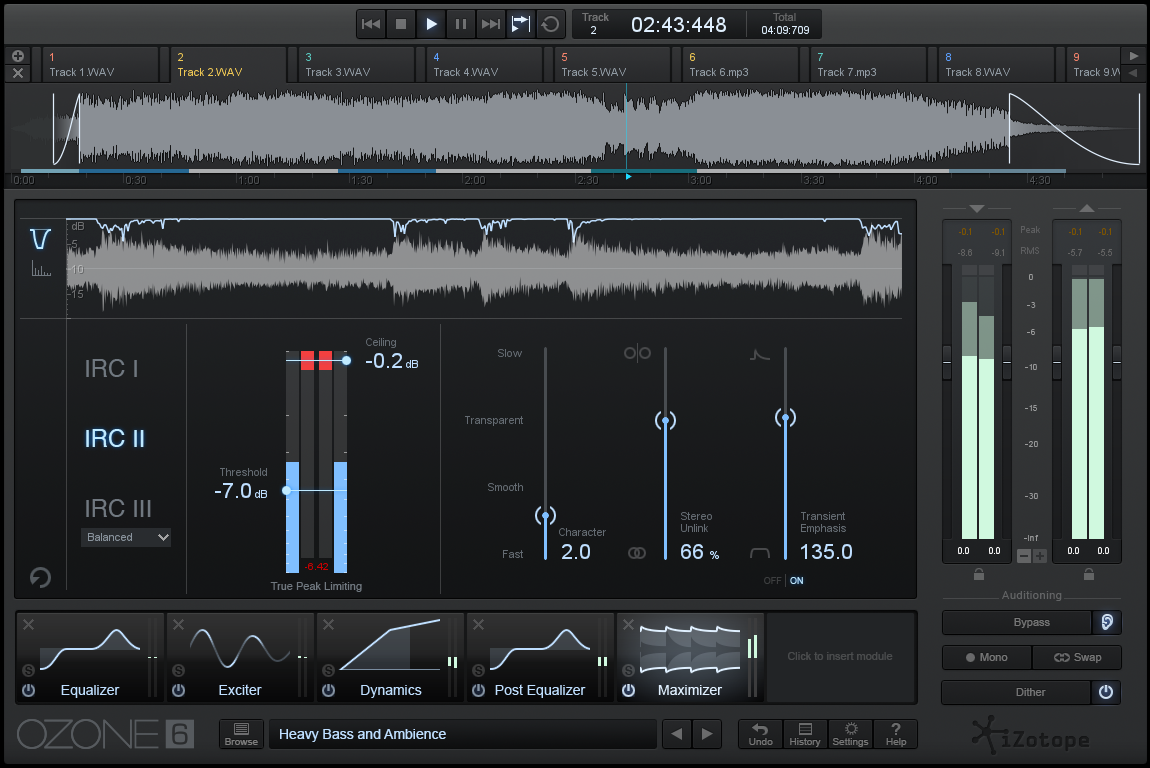
Izotope Ozone is a multi-tool mastering stand-alone application and multi-format plug-in. Version 6 has some significant changes over previous versions including a different interface. It comes in plain and Advanced versions. Ozone 6: $249 USD, Ozone 6 Advanced: $999 USD.
Good: Great sound, easier to use, better look and feel, some cool new features and more flexibility in multi-band modes. New Dynamic EQ in Advanced version. Bad: Removed “Amount” sliders. Advanced version is overpriced.
8 out of 10 – Worth buying/upgrading.
Izotope’s Ozone has become quite a stalwart of the low-to-mid-budget mastering scene over recent years. One of its key advantages is having an entire suite of mastering-ready tools condensed into a single mastering plug-in.
Frequency Soloing
My own favourite reason for using Ozone over other mastering products was the cool trick of being able to hold down the Alt/Option key and then click in the EQ display with the mouse to solo a particular frequency. This made finding troublesome resonant frequencies ridiculously simple, fast and intuitive, and even when I moved into using other mastering tools, I still preferred Ozone’s EQ section for my precision-repair EQ’ing purposes. In the very-expensive Advanced version, each processing module also comes as a separate plug-in, so working with other mastering plug-ins is easy. I’m very glad to see this feature has not vanished in Ozone 6.
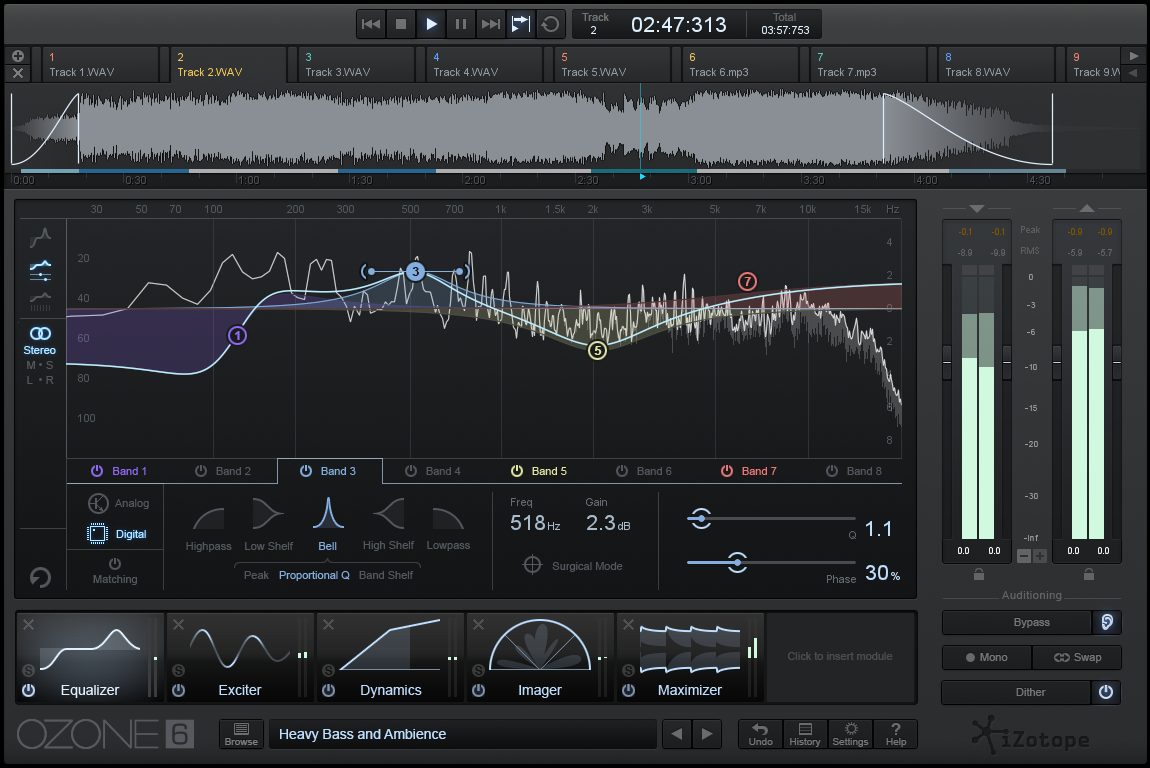
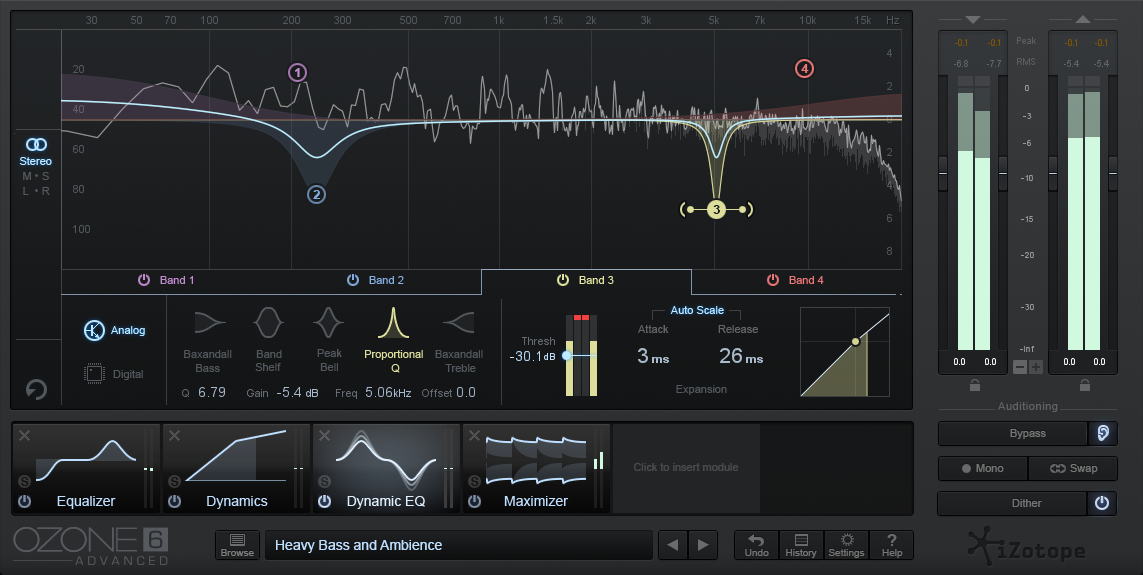
EQ Section
On the surface, not a lot different that it was before, but laid out a lot better. There’s eight EQ bands that can be switched between high pass/low pass/bell/high and low shelf and Baxandall (new) filter types, and as usual an excellent spectrum analyzer that lets you see a detailed view of what’s going on in the mix.
There’s a global button for Digital and Analogue EQ modes. Analogue mode includes the phase-shifts from real EQ types that add their own phase responses, and you can even select different types of filters depending on their type – including Analog, Vintage, Baxandall, Brickwall, Proportional-Q, Band-shelf and Resonant modes. If you want to see exactly what’s going on with phase, there’s also an optional display of Phase Delay, Phase Response and Group Delay.
If analogue colour is not your thing, then the Digital mode avoids it almost completely. You can switch into “Surgical” mode for super-accurate editing of EQ. But then you can still tweak the phase response for each band with a little “phase” slider.
And as with previous versions of Ozone, there is a “Matching” button for matching an EQ sourced from another track, or even against Pink Noise or 6dB Slopes.
Amount Sliders
One of the things I immediately noticed was missing in Ozone 6 was the “Amount” sliders. In Ozone 5, these handy sliders scaled the processing amount for each section (and globally). This was a convenient way to correct some heavy-handed tweaking after spending too long in the mastering zone, and provided much more detailed feedback on exactly how much processing was needed than the simpler “Bypass” button. I can’t believe this awesomely useful feature was removed – it seems like such a major step backwards. The Parallel and master Gain sliders in the dynamics section do go some way towards matching the features but nowhere near enough.
Multi-band Sections
Finally, the multi-band dynamics, exciter and imager sections can each have an independent number of bands and different crossover frequencies. And even different types of crossover as well – analogue, digital or hybrid.
This is great news – it’s often been hard to find an ideal crossover point that suits all three processors at the same time.
Actually it’s often difficult to find the ideal crossover points at all – most people I know don’t even touch the preset ones.
Ozone 6 has a added a new “Learn” feature to each multi-band section that can automatically set the crossover points based on the audio itself. it’s certainly fun watching the crossovers whizzing all over the place as they detect what’s going on in the audio spectrum, and they seem to settle not far away from where I’d put them myself. Nice!
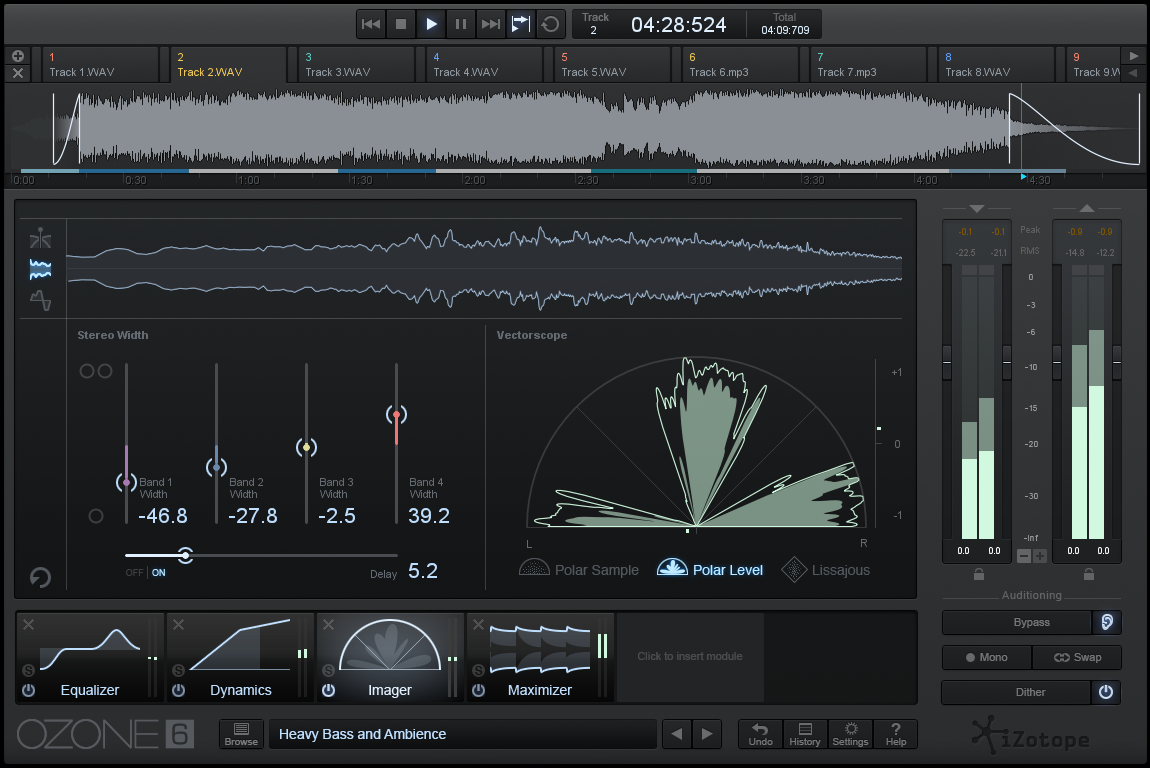
Mid-Side Processing
As with Ozone 5, the new version has M/S processing in its EQ, Dynamics, Exciter and also in the (Advanced-version-only) Dynamic EQ sections. Mid-side processing has become quite common in mastering workflows, and allows the center of the mix to be treated separately from the outsides. This gives increased control over things like vocals vs guitars.
Dithering
I notice that the dithering algorithm choices have been reduced from three to just one; MBIT+. This makes sense, as most people probably just used the default setting (if at all!). One nice addition here is being able to see the dither noise-shaping curve itself.
Mastering Reverb
The Mastering Reverb has gone in Ozone 6 as well. I’ve only ever used this twice in all my years of mastering with Ozone, and I’m guessing it caused problems with amateurs adding reverb to mixes they shouldn’t, so it’s probably safer to not have it.
Look and Feel
Looking at the overall look and feel of the new Ozone 6, it appears that they have adopted some of the design simplifications that have been applied to other Izotope products such as Alloy. I think these changes are generally an improvement – everything feels much more transparent and a bit simpler to use. There’s less visual confusion, and the simpler more 2-D look actually works well.
Processing Module Section and Browser
I really like the new modular tab along the bottom. Various processing modules can be added and removed and the order of them changed by simply dragging them around. This sort of functionality was present back in version 5 to some extent (it was called “Graph”), but it was significantly more limited than this new version. It’s simple to use. Being able to move the multi-band sections around as easily as the single-band sections is a big plus.
Standalone Mastering
One of the cool new things with Ozone 6 is that it is not just a plug-in, it is also a standalone app that can import audio files directly.
(Although not mp4 MPEG2 file formats which is a shame – it will ironically open poorer-quality mp3s though). It would be good to see 32-bit float file formats supported as well.
You can open multiple files as a project and have different Ozone settings on each file, as well as reshuffle the track order, and do bulk exports. Although each track has handles for trim and fades, it doesn’t allow you a full CD-layout with associated song overlaps and index markers etc. Each file still remains individual, so if you’re doing CD production you’ll still need a specialist application that can create a CD playlist such as Apple WaveBurner, Sony Sound Forge, Steinberg Wavelab, or DSP-Quattro.
As a real bonus, you can also insert other plug-ins (VST or AU) within the standalone app.
Dynamic EQ
Another new thing in Ozone 6 is the Dynamic EQ (in the Advanced version only). I’m somewhat familiar with the Brainworx Dynamic EQ and this works in similar fashion – although the Ozone one is a little simpler. You set an EQ and adjust the trigger threshold and it variably boosts or cuts that frequency band depending on its audio level and depending on whether you applied a boost or a cut. You can flip the response the other way as well (ie it will cut instead of boost or vice-versa). It’s pretty cool, and in many ways is a good substitute for a single-frequency-band treatment using Ozone’s multi-dynamics section. Great for rumbly sound-hole acoustic guitar tracks.
Insight Plug-in
As with Ozone 5. the Advanced version comes with the Insight plug-in. This is an advanced metering plug-in that not only gives several more metering options, including LUFS and other TV and film-based loudness meters, but also allows collective metering of multiple tracks in your recording session.
Conclusion
Overall this is a good offering from Izotope. The sound quality is superb as expected, and the new and expanded features are excellent. Almost anyone should be able to pick up and use this plug-in, and the fact that it can be used as a standalone mastering processor will tilt the balance for many people.
I’m still a little gobsmacked about the lack of “Amount” sliders, but the other great features help balance this loss out. Maybe they’ll add them back in in a future release. We can only hope.
Regardless, upgrading to Izotope 6 would generally be a good value decision.
On the other hand the Advanced version would take more careful consideration.
It’s a shame the “Advanced” version is so ridiculously expensive. At $999 USD (that’s nearly $1,300 where I live) it’s FOUR TIMES the price of the vanilla version.
That puts it well out of the reach of most casual users and small studio owners, and although I agree most of the missing features would genuinely be considered “pro” it’s such an artificial and arbitrary method of getting extra money out of users, and consumers see this sort of thing as a bit of a rort – a poor pricing strategy that can eventually have fallout on a brand. Personally, I would be tempted to just invest the difference in price into other nice mastering plug-ins from other reputable suppliers like UAD or Slate. Izotope seriously needs to look at their pricing strategies in this regard.
I’m surprised that so many music sites insist on using mp3 format for their files despite the generally poor quality – even Soundcloud uses only 128kbs mp3 – when AAC is a patently superior file format at that same file size/bandwidth. Most noticeable is the retention of transients (eg drum beats) and much better top-end response. AAC sounds almost like CD-quality.
Key points
mp3 is generally MPEG 1 (layer 3). They did extend it slightly in MPEG 2 to add some lower sample rates and some different channel formats.
AAC (Advanced Audio Coding) is MPEG 2 and also in MPEG 4.
mp3 only uses 576 blocks to encode audio.
AAC uses 960 or 1024 blocks to encode audio.
Note: MPEG stand for Motion Picture Experts Group – the standard-setting body for this sort of stuff.
There’s a huge difference in quality between the formats – mainly because they tweaked the hell out of the encoding algorithm after the original mp3, so 128kbps AAC sounds almost like CD-quality, whereas mp3 128kbps sounds phasey and dull.
AAC is also what’s generally used nowadays for radio broadcast – they call it MP2 though, to confuse the production people.
So what about MPEG 3 and 4 then?
MPEG 3 only had a couple of tweaks to add to the standard, so rather than having a completely new standard, they just updated good ol’ MPEG 2 instead. They added things like more channels for surround-sound files and the like.
MPEG 4 was mainly about metadata (information embedded in the files) and even more channels – basically bundling a variety of video and audio formats (and other stuff like subtitles) into a handy container called “MP4”.
If there’s only audio inside it, it gets called M4A. Though some M4A files can also contain Apple Lossless format at master quality, but at a larger file size. Lossless formats are more like zip files – they’re compressed down to smaller size (not as small as mp3 or AAC) but can be expanded again without any loss.
What’s this bit-rate thing?
Since most of these lossy formats were designed to be streamed – either on the internet or off an optical disc, they’re measured in how many bits per second they need.
Is that the same as sample-rate?
No – mp3s and AAC files still retain the original sample-rate and bit-depth as the original file. At lower bitrates, obviously more information needs to be trimmed out of the audio to make it smaller – hence the quality loss.
So why do we still use mp3 rather than AAC?
Well, if you’re using Apple products, you’re likely using AAC way more than you know. Otherwise, mp3 has just been around longer and more software can be guaranteed to play mp3s than AAC (although it’s pretty rare that something can’t play both now). It’s like the old VHS vs Betamax video tape format thing all over again – the lowest common denominator (and cheapest format) usually wins against quality.
So what should you use?
If there’s a choice – go with AAC. If not, go with mp3. Simple.
One of the cool things you can do so easily in a DAW (Digital Audio Workstation) is slip entire tracks, or actually the regions within it, to the left (earlier in time) or to the right (later in time).
What’s so cool about this?
There’s a couple of things you can do with it.
1. Correcting Microphone Delays
One fairly obvious example is tightening up drum kits. It’s pretty common to use room mics when recording a drum kit. Let’s say your room mics are 3m (9.8feet) from the snare mic on the kit. That’s about an extra 8 milliseconds, or (@44.1kHz sample rate) 353 samples.
If you slid your room mic regions 8ms/353 samples to the left, the recorded signal would coincide perfectly with the snare mic – ie there would be no delay between the mics.* Note that you’ll need to have all your tracks starting a little bit later than 0′:00″ or Bar 1 so you have some “left” to go to.
You don’t have to pull the room mics all the way back though – you might just want to pull them a bit closer in time to tighten up the room sound.
2. Creating a Pocket/Helping the groove
This is where you can subtly shift the timing of regions to help the overall groove of the track.
For example, many bass players get a little excited when recording, and can play a little ahead of, or right on top of the drum beat. Although it’s still “in time”, sometimes delaying the bass very slightly can make it “groove” more with the drums.
In this case you would incrementally slip the bass region/s to the right until the groove feels better. The kick drum often masks the attack of the bass to a certain extent, so it can also clean up the kick/bass combination.
It can help to think of being “in-time” as a window rather than a vertical line, and you can be at one edge or the other of that window and still be in time, but get some huge changes in “feel”.
How to do it
There’s a couple of methods.
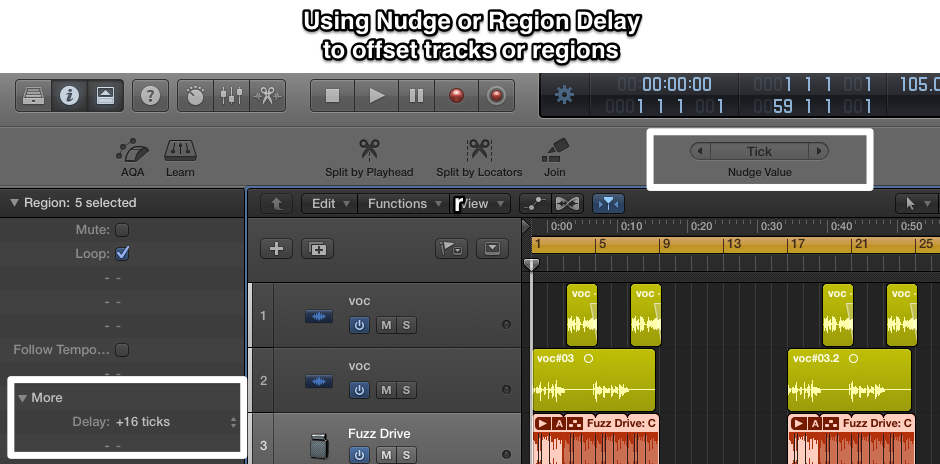
Shifting the actual region itself using “nudge”. In Logic or Pro Tools you can incrementally bump something in either direction by using the nudge keys. You can set the nudge value to pretty much anything -samples, beats etc. The dangers of this method are if you give the files to someone else to mix they may not realise you’ve moved track regions away from the same start position. Keep good notes!
Region Delay in Logic Pro
In the region inspector (under “more”) there is a parameter for Delay. You can set it earlier (- values) or later (+ values). The handy thing about this way of doing it is that you can split each track into different regions for chorus/verse etc, which can each have a different delay value.
Using delays. This is the old-school way of doing it. Insert a delay plug-in (with the same delay value eg 500ms) on every track. If you want to make a track play earlier – lower the delay for that track. If you want it later – make the delay longer. The beauty of this method is that it automatically keeps a record of what you’ve done by saving the plugin settings.
*Phase problems. Watch out for this. Once you get down to a few samples difference between different microphones on the same instrument (eg the drum kit), you’re potentially going to get phase issues. Sometimes even a few samples can make a difference. The wavelength of around 2cm (almost an inch) is 13.5kHz, so that means moving the microphone “virtually” even that much can make a big difference. This is where phase “rotation” plugins can be handy – such as UAD’s Little Labs IBP Phase Alignment Tool.