Just trying out the new portfolio mode in Jetpack/Wordpress – but it’s hard to find the Portfolio content when you’re just browsing the site, so go here if you can’t find it:

Just trying out the new portfolio mode in Jetpack/Wordpress – but it’s hard to find the Portfolio content when you’re just browsing the site, so go here if you can’t find it:
It’s no secret I’m a big fan of Universal Audio and their products – I have my Apollo Quad and a selection of my favourite UAD go-to plugins.
Coming from a lifetime of mainly indie recording and freelance work, I’ve managed to avoid working more than occasionally in expensive studios with swags of outboard equipment. So I’ve always had expensive tastes but only depressingly-low indie budgets, making the availability of rare and expensive vintage equipment well out of my price range.
But the alternative – virtually-modeled vintage hardware – has always lacked some part of the magic of those original analogue versions. Until lately. Now increased computer processing power and more detailed and accurate non-linear modelling processes have allowed more of that magic to be emulated in software, and also processed in real-time. Waves, Slate Digital and others have done wonders with the quality of the software models. Universal Audio started off way back in the day making analogue gear, and then relatively recently moved into the digital world with their UAD side of things. Despite the move into digital, their ethos has remained based on professional-audio quality. And by hosting those resource-hungry plugins on some external processor chips, it also allowed for higher-quality modeling and/or more plugins to be used.
When I first heard the UAD plugins, I was sold. It was the first time I had heard plugins approach the original sound I was used to. In my case it was the Studer A800 plugin, which felt remarkably close to what I’d been using for years. Was it exactly the same? I didn’t have the opportunity to A/B between them, but it “felt” and sounded the same as I remembered. It did the same things to the recorded tracks that I used the original for – the same colouration and compression I wanted for certain instruments. Except I could also turn off the tape hiss if I wished, and eliminate the wow and flutter. So the models not only recreate an original unit pretty closely, “warts and all”, but also allow you to disable some of the inevitable (and at the time really annoying) down-sides of vintage analogue technology. Or they might include some extra features that enable some easier practical uses, like having a mix control. By the way, they also allow a budding engineer/producer to get a feel for the vintage interface before they ever run into a real one in the studio. So – I have been relatively spoiled by my UAD plugin collection.
When I had to upgrade my cheapo portable (OSX Mountain-Lion unsupported) Presonus Firestudio a few years back, I sprung for a UAD Apollo Quad. It’s been great. I bought the Thunderbolt option and never looked back.
So it was quite a pleasant surprise to have this v7.5 update not only add a few extra plugins to the collection, but also to add extra functionality to my Apollo hardware. It’s a bit of an “Easter-Egg” really – apparently the functionality has always been there. The new preamp plugins directly access the preamp chips on the Apollo board and can adjust not only the gain, but also the impedance. This means that you get that much closer to the authentic sound of the real preamps.
You get a choice of three preamps – the UA610-A, UA610-B, and the API Vision channel strip. These slot into a new “Preamp” slot in the Apollo Virtual Console. The beauty of this is that you can then record through them as if it is real hardware.
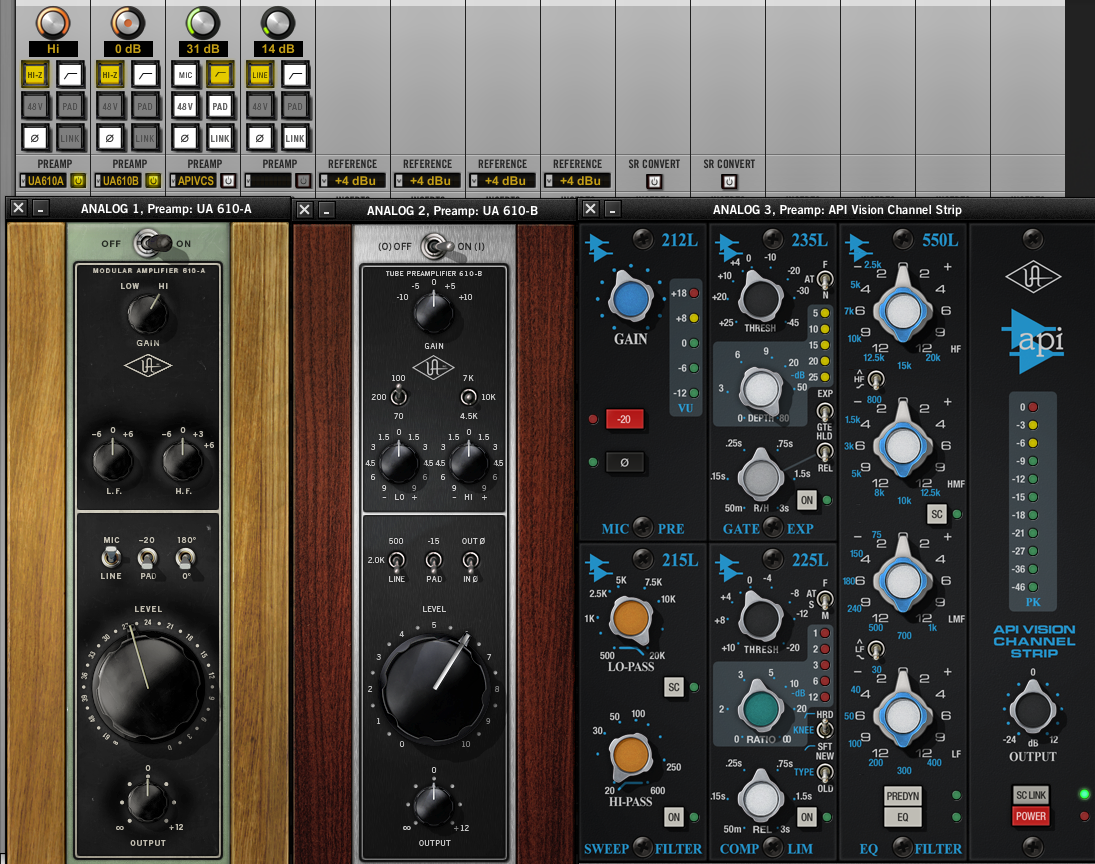
How do they sound? Well – remarkably good. I tried various mics (Ribbon/Condenser/Dynamic) through each preamp type (even my gritty little Shure Green Bullet), and the difference in character and smoothness of each preamp was quite noticeable. The quite neutral preamps built into the Apollo itself allow the plugin character to feel pretty genuine, and the impedance selection just nails it. The harmonic overtones when driving them hard felt completely analogue.
I did have some initial issues figuring out how to match gains when switching between the built-in Apollo preamps and the plugins (they have their own gain and level controls) for comparison, but once I sorted that out, there’s no way I’d ever go back to NOT using one of the new preamps. They all added some level of subtle musical character to the microphone, and the hardest bit was choosing which one was the most suitable for each mic or thing I was recording.
My favourite is the 610-A at the moment, but that’ll probably change for my next recording.
For those that recently jumped into purchasing Apple’s latest version of Logic Pro X, there may have been a few nasty surprises with older 32-bit plug-ins not working.
That’s because Apple finally dropped support (as it seems to do on a fairly regular basis) for aging 32-bit plugins and instruments. Actually, they just removed the 32-bit plugin wrapper which Logic 9 had. The wrapper was pretty clunky and annoying anyway – it continually stole focus from Logic when you needed to open a 32-bit plugin’s graphical interface.
The lack of Logic’s 32-bit wrapper means that third-party plugin providers would now need to update all their plug-ins to 64-bit, or they simply wouldn’t show up in Logic. Unfortunately, the outcome of this strategy is that it can take ages for manufacturers to get around to updating all their products, especially the older ones that may not have been coded very tidily in the first place. In fact some manufacturers had already dropped support for older plugs and instruments, so the likelihood of getting a shiny new 64-bit version of some products is pretty much nil.
That’s a bit sad when you want to open up a song you created only a couple of years ago (because you might not have finished it yet), and instruments and/or plugins are missing. It can completely change the track – it may even remove the main hook sound that the track was built around.
Even with instruments and plugins that have actually been updated to 64-bit, there are issues. Some newly- ported 64-bit plug-ins do not open up their original patches anymore. This can be phenomenally annoying. Imagine your joy at finally being able to open up your old song in Logic to do some more work on it, only to find that the instruments or plugins you used have been restored BUT they are restored to completely different sounds or settings. It’s tedious enough trawling through hundreds of presets trying to locate the one you used for your song, but it’s way worse if not impossible to recall a patch if you actually edited it as well – it means you may never get that exact same sound back.
Of course you could simply keep an older version of Logic on your computer to open these older songs, and sometimes that works, but even then it’s not always that simple. Installing later versions of some products pretty much destroys the previous version’s patch library, so even opening in Logic 9 doesn’t get them back. Can you feel my simmering anger?
But look – there’s a shining star on the horizon! Sound Radix – a company with some quite interesting plugins themselves, observed the problem everyone was having with lack of 32-bit support in Logic Pro X and came up with a great solution. What they did was create a very tidy wrapper for your 32-bit plugins. Due to the quirks of some older products, not everything was supported at first, and 32 Lives is ostensibly a “beta” product (it’s just reached release candidate recently). Regular updates were released to make even more 32-bit plugins compatible. I found that even some of the plugins that weren’t on their compatibility list seemed to convert and operate just fine.
So how does it work? The application scans all your installed AU plugins and comes up with a list of the 32-bit versions. You can select which ones you wish to wrap, and away it goes wrapping them. It creates 64-bit versions of each of these plugins. Then when you open Logic Pro X (or Logic 9 in 64-bit mode), Logic scans the “new” plugins. I found this to be the most tedious part of the process, and Logic’s scanning process actually seemed to reject a bunch of the wrapped 32-bit plugins when it completed. I think there are issues with the way Logic scans multiple plugins at the same time on different CPU threads, so if one instance of Auval (Logic’s AU plugin-scanner) or 32 Lives crashes during the scanning process, it can affect other threads. I found that selecting each rejected plugin/instrument manually in AU Inspector in Logic seemed to add the rejected ones just fine in most cases. (Note – this scanning issue has all been sorted out in subsequent releases of 32 Lives)
The wrapped plugins and instruments now appear just like 64-bit versions – but there’s no annoying visible wrapper like in Logic 9. The patches you originally used are also restored. It just works. Transparently.
I spent several hours opening up old Logic sessions from years ago and had no problems opening them up and playing them. Actually my only issues were with really old versions of Native Instruments products, but that’s another story.
So – I have to say I was pretty darn happy with this purchase. Good on you, Sound Radix!
It continually surprises me (yes I’m in a perpetual state of surprise) how many Logic users don’t use (or even know about) the Marquee tool. Then again, I remember the first time I tried using the Marquee tool, and all it did was annoy me since I didn’t really know how to use it, so perhaps that’s what’s happened to everyone else as well.
Well, fear no longer people, here’s the tricks to some happy Marquee Tool use in Logic.
Also – one of the common whinges from Pro Tools users is Logic’s lack of a “Smart Tool” mode – where various tools are automatically selected by their position on a region. This function is always partly-available in Logic anyway (just trim & loop), but you can easily add a couple more tools to the palette by following the next screen shot. This works in Logic 9 as well.
As you can see, I prefer to assign my right mouse button as a tool, and just use Ctrl-left mouse click to bring up any menu items I need. That way I have even more edit tools rapidly available.

By selecting these options above, the good ol’ Pointer tool will now automatically become the Fade tool on the TOP right and left of a region (click again and drag up and down to change the shape), and the Marquee tool when in the BOTTOM-half of a region. This is in addition to the traditional Pointer tool also being the Trim tool on BOTTOM left/right of a region, and Loop tool on MID-right of a region.
I recommend that you try these settings and persevere for long enough to get used to them, as it will speed up your editing, and it helps when jumping between Logic and Pro Tools. It does take a little more precision and decent zoom settings but the pay-offs are worth it.
It’s at this point in the article that I rediscovered the annoyances of trying to get decent screenshots of Logic’s tool cursors. You can’t do it with the usual Apple shortcuts or even the Grab utility. The cursor doesn’t show up as other than the usual boring cursor (Grab lets you choose a few other cursor options, but certainly not any of the Logic tool cursors).
SO – I made you a short video instead, using Screenflow. I show the “smart-tool” setup and use, then how to use the Marquee tool.
Here it is;
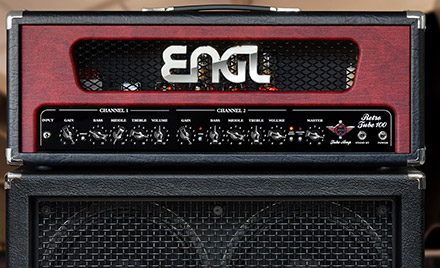
The latest release of UAD’s plugins (V7.2) includes two new Brainworx ENGL guitar amps and a tuner.
Universal Audio regularly poll their users to find out what sort of plug-ins they want developed next (I just responded to one of their surveys the other day), so I assume guitar amps must have rated pretty highly on the list lately.
Although I think I’m more into the nice UAD compressors, channel strips and reverbs, I have to admit that I’ve found myself using the UAD version of the Softube Vintage Amp Room and Bass Amp Room plugins quite a bit lately. I don’t consider myself a real guitarist (ahem – I’m a bass player) but I’ve played guitar in bands and on recordings for about 20 years or so, and recorded an infinite amount of other people’s guitar solos. As I can’t remember the last ENGL amp I used in the studio, it will be interesting to see what these new ENGL plugins bring to the game. I’d have it by now if my Firefox beta wasn’t screwing with my downloads.
“Snap” – two hours later, I’ve had some dinner, installed the update and opened the new plugins in LogicProX. I plugged my Fender Jag-Stang with EMGs straight into the Hi-Z input on the front of my UA Apollo and flicked through the presets in both versions of the ENGLs – the E646 VS and the E765 Retro Tube.
The first thing I realised was that I needed to replace the strings on my guitar – they are pretty dead. The next thing I noticed was that the ENGLs have a really authentic presence, especially on the clean tones on the E646 VS. It has that sweet almost-rattle in the valves with a smooth progressive grittiness to the note attack. The intermodulation distortion between notes of a chord is beautifully rich and creamy. The cabinet sound feels like a real miked-up cabinet in a studio, with a tight but visceral attack on the low notes. 
Actually the latency, though pretty low, was annoying me while playing through Logic, so I inserted the plugins straight into the Apollo Console app. This removed all the latency and made the response feel totally immediate. I also figured out how to record both amped and clean guitar at the same time, but that’s another story.
I’ve been using Native Instruments Guitar Rig at home for years now, and loving the tones I can get with it. I’m also pretty impressed with the new guitar and bass amps that come with LogicProX. But there’s definitely something more “real” with the ENGLs – if you close your eyes you can almost “see” the guitar amp in the room.
Moving into the more distorted tones of the E646 was satisfying, but with high-gain settings it lost some of the magic real character of the clean tones and felt slightly more “generic”. There’s some nice tight metal presets in here though, as well as some nice classic and alt/punk rock sounds. There’s a delay included as well, plus you can trim the input from the guitar (to match pickup types) and pull the cabinet level back with a powersoak knob.
The ENGL E765 Retro Tube amp sounds a lot fatter and warmer than the other amp. The clean tones are a lot grittier/crunchier but still fat sounding. The distortion tones are really nice and creamy – again they tend to become a little oversaturated after a while and begin to sound more like some other plug-in guitar amp versions.
Both amps are overall a pretty solid offering. It feels like there’s some tasty non-linear modelling going on in the amp head section, because the tone and harmonic content reacts nicely to playing level and style. The cabinet/ambience feels like it is provided by a more linear captured impulse response. Overall I thought both of these amps are impressive. I love the clean amp sound on the E646 VS so much I can see myself using it quite a lot in the future.
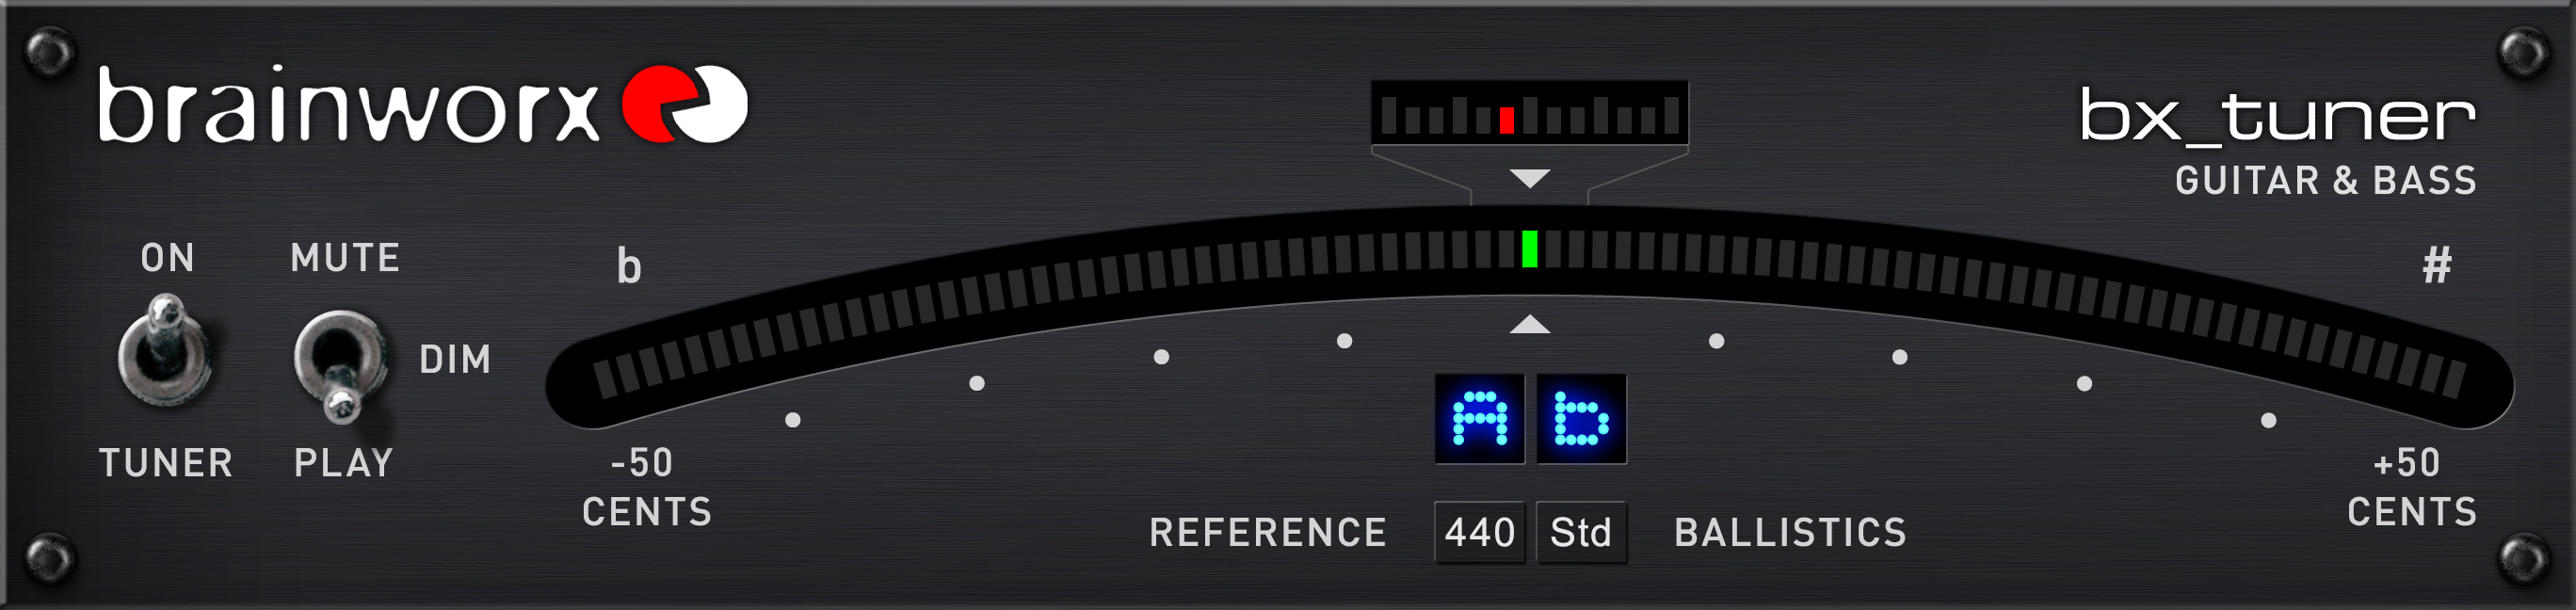
Oh, and the new Brainworx tuner is a handy little plug-in. It’s simple and tracks pitch well. You can adjust the meter ballistics and have it automatically mute or dim the level on the guitar while tuning-up. Nice.
TL;DR (Too long; didn’t read)
Get the new version of Logic – it’s definitely worth the relatively inexpensive $259NZD ($200USD) for bug-fixes alone, and more so with all the cool new added features.
Keep your old Logic version just in case you still need those 32-bit plugins.
Appearance:
It looks slightly GarageBand-ish, but without the woodgrain skeuomorphisms.
Maybe it’s more like the other Apple Pro Apps – very dark background, almost neon coloring for media and highlights. Very high contrast.
Some people will hate it, but I use so many DAWs and have been mentally preparing for any changes to the Logic 9 “look” for so long that I really don’t mind. I still think it looks better than Ableton Live.
The overall layout appears much cleaner, with more space for the Main Window (no longer called the Arrange window). Apple removed the transport bar at the bottom and included all the menus and transport controls at the top of the main window, with an extra row of customizable tools revealed with a button.
The various editor and media tabs are in their usual places. The Library is now on the left and includes a few more visual features (eg patches for Drummer).
Old Version 9 Features
Nothing really essential has been cut out as far as I can tell – just moved or upgraded.
A couple of seldom-used items in the sample editor have gone – Audio to Score for example, and the murky Averb now seems to be absent (it still shows up in pre-X projects).
(Edit: Behaviour of SOLO is different – you can’t solo individual virtual tracks going to one instrument. This used to be a preference option that is now missing. A bit of an annoyance and less “Pro”).
All menus/functions still appear to be included, but they have been re-sorted under menus that are a bit more workflow-oriented. They actually make more sense this way and are pretty intuitive. An improvement.
Main New Features
Flex Pitch mode operates just like Celemony Melodyne – you can adjust the pitching of sung notes, adjust vibrato, shift the formant, tilt etc. You can also adjust timing and length of notes. It’s pretty easy to use and is fairly transparent.
The new Drummer gives us some cool-sounding sampled drum kits and associated grooves that can be tweaked to give degrees of human feel with nuances, fills etc. Somewhere between an instrument and a track (you choose it as one of your New Track options), it shows up on the track as a sort of “virtual waveform” that reflects the content of the beat you select, and that can then be control-clicked to show editable MIDI regions instead. You can manually use just the drum sounds by selecting Drum Kit Designer from the instrument menu. I can see a lot of songwriters using Drummer.
Track Stack
This is pretty cool. There are two stack modes for this powerful new function.
The first mode – Folder Stack – is essentially a new way of bundling tracks into a folder. This is a much more graceful method of managing groups of tracks than the old add-to-folder method, as it has a master track that can easily mute or solo all the included tracks. And you can hide or reveal all the included tracks with a single click on a disclosure triangle. Folders are still included in Logic, but are now hidden away under a branched menu. I guess they want to phase them out and use this new way of doing things.
The second mode – Summing Stack – is an easy way to assign a bunch of tracks to an Aux bus – eg drums. This is the most powerful mode of the two, as you can also create Summing Stack presets, and you can do some cool things with multi-output software instruments – eg multi-output drums. This will be a useful way for people to manage their instrument and vocal groups.
I use summing groups all the time, but this new stack mode makes it pretty much idiot proof – just select a bunch of tracks – right click and “Create Track Stack”. The only annoyance is it uses the next available numbered bus, and I have all my buses pre-named for mixing purposes – eg vocal effects, rhythm effects, drum/bass/guitar/voc bus etc. Just a niggle.
MIDI Effects
Yes, finally you can insert an Arpeggiator into a MIDI channel strip directly, without having to brave the scary Environment window.
These MIDI plugins affect what is played live or played back from the recorded track. Pity you can’t also record this data onto the MIDI track itself – it would be even more useful.
There is a bunch of MIDI plugins you can insert – chord memorizer, modulator (yay – modulate MIDI parameters in time with your song!), scripter (yes you nerds out there can write your own scripts to affect the MIDI data coming off the recorded track) and a few more. They show up as green plugin slots in the channel strip.
Arrangement track
This was one of the cool things that GarageBand had that Logic strangely didn’t (you had to use the Marquee strip instead). You can now label song sections on the new Arrangement Global Track and then just move the sections around to easily rearrange your song.
Smart Controls editor.
A new panel that allows you to adjust “macro” knobs to control plug-in and instrument parameters on a channel. They can be customised, automated and also controlled via hardware. A bit like the macro knobs in NI Massive, or the control panels you build and map in MainStage.
Track/File Editor
The old Sample editor has been replaced by a panel that switches between two modes – either close-up non-destructive editing of an audio track (eg Flex Pitch or Flex Time operations), or destructive editing of audio files (okay here it’s just the Sample editor with a different name).
Piano Roll
Almost the same as it was before but with a couple of cool new features. You can now quantise selected MIDI notes to a key or scale, and adjust the overall MIDI velocity for the region with a slider.
Retro Synth
This new instrument plugin is pretty cool. It sounds good and has four different synth types on different edit tabs – analog, sync, wavetable & FM. Some new flavours, or perhaps just a one-stop-shop of some of Logic’s existing synth plugins? I’m not sure as yet.
Quick Help
Like Ableton’s help system – it shows handy tips for whatever you’re pointing your mouse at.
Saving into project folder or into a project “bundle”.
You now have a choice of whether you want to save each song as either a regular old folder-based project, or into a single-file bundle (like GarageBand projects). Not sure of the advantages/disadvantages of each yet, but it’s simpler to backup or copy or move one file than a whole folder.
Setting a Groove Track
You can choose a track to be the master Groove Track for the song, and then have other tracks follow this, rather than be individually quantised. (You can’t do both).
This looks good. Previously you had to create a groove template and then select that same groove template as a quantize option on the other tracks. This was easy if the source was MIDI, but if it was audio you had to convert the audio to MIDI first. Finicky. Now it just does it with either MIDI or audio tracks with the click of an icon.
Bug Fixes and Tweaks
Zoom appears to work much better – including in the audio editor – with more accurate centring/playhead tracking, and with more waveform detail (including waveform zoom).
Scrolling along the timeline is also much improved – especially when scrolling outside the Main window. It used to take off in a frustratingly jerky way that managed to annoy every Logic user ever. Now it remains smooth and consistent.
Logic’s B3 Organ, the Clav and the Electric Piano instruments have all had a face-lift and been re-branded as Vintage B3, Vintage Clav and Vintage Electric Piano, with some additional controls. Not essential, but nice.
Hitting Solo doesn’t light up the bar ruler in yellow as it did before – it now darkens every region not solo’ed and the transport meters now display as yellow. A bit more obvious that you’re in Solo mode now, I hope, since it’s one of the things that catches everybody out at some point.
Cool bonus extras
Faster startup time
Logic no longer tediously scans every AU plug-in in your system every time you run it. I can’t say how awesome this is. Thanks Apple – about time! Can I have back the several hundred hours of sitting through the old startup process please?
Autosave
Logic takes regular snapshots while you work and saves it into the project file. You can revert to any of these. You can also save different versions (“alternatives”) of the song into the main file. I save every 10 seconds anyway, but others might find it useful.
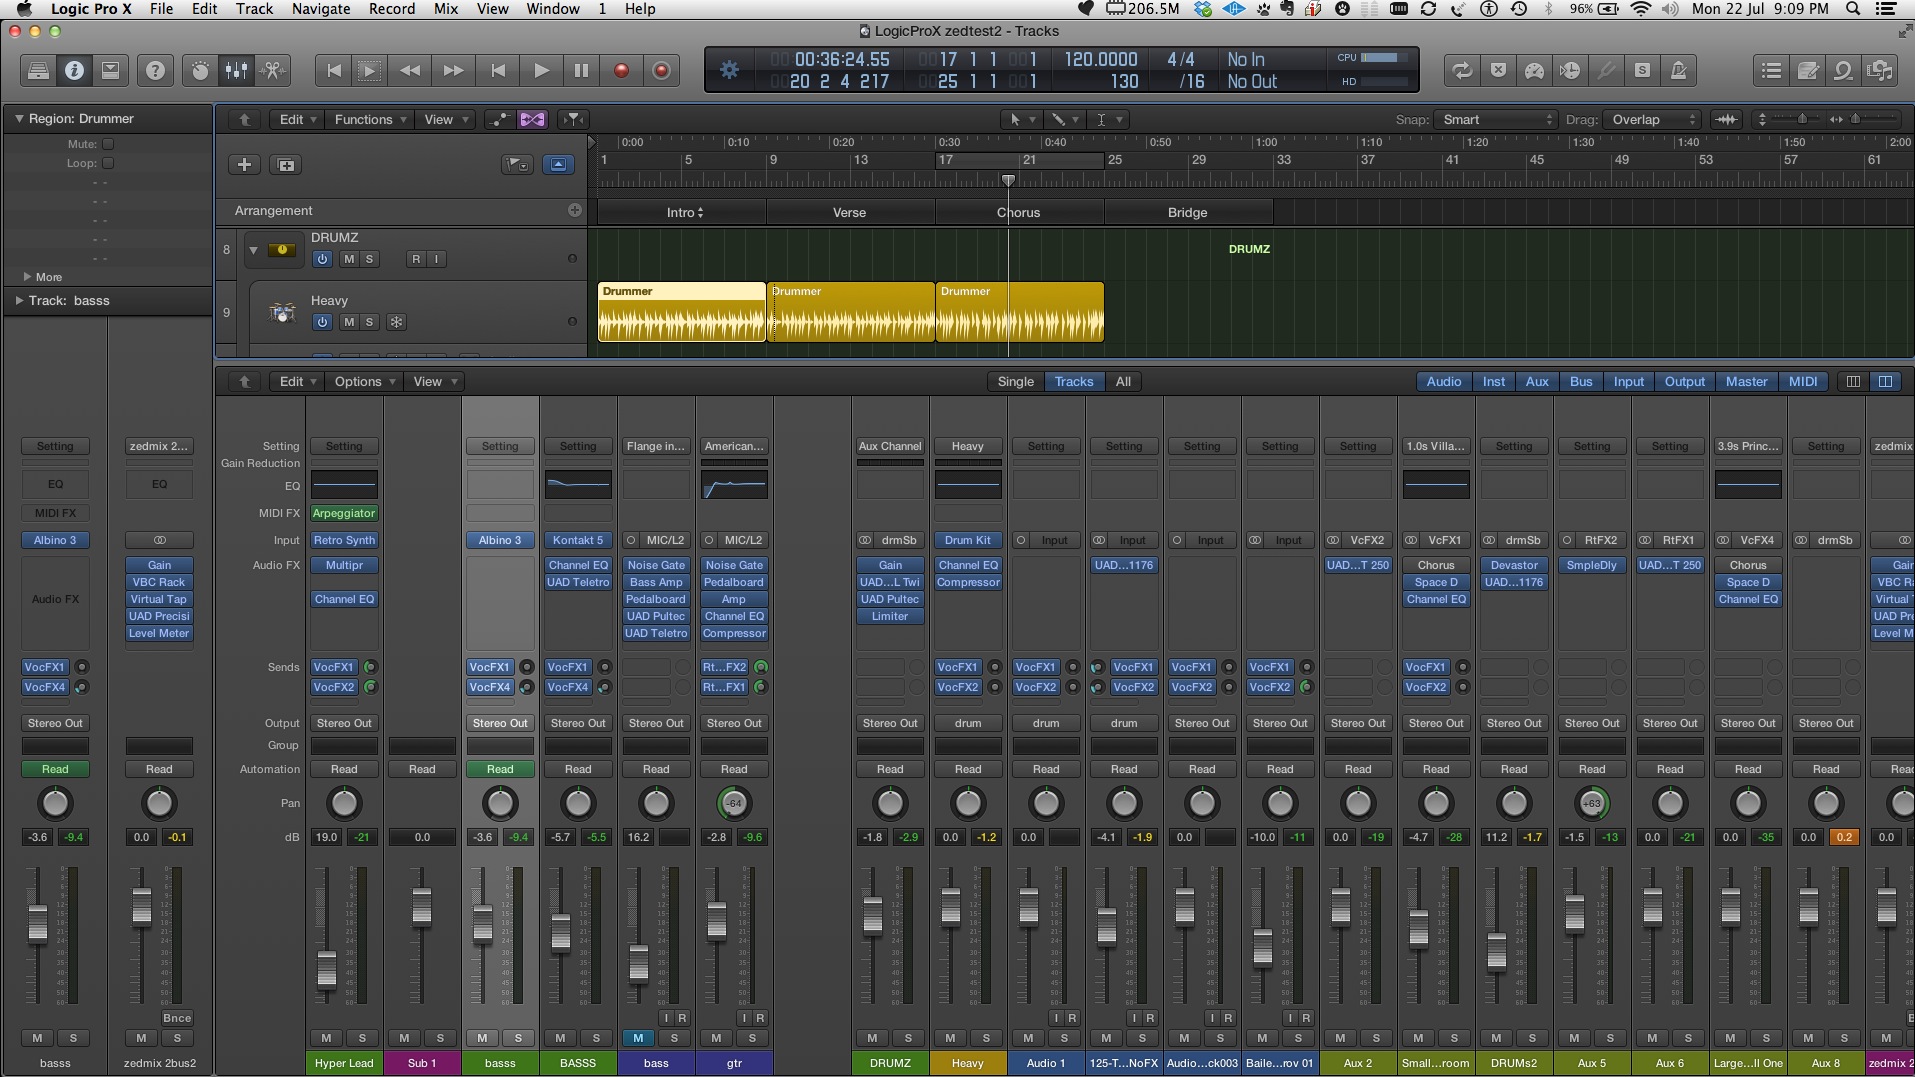
Channel Strip components more closely reflect the order of signal flow.
This is a move against typical convention, which mirrors physical analogue console design, where more regularly used items are generally closer to the engineer.
Re-ordering the components is a really good move that makes more sense in the digital world- especially for users who are coming into Logic without ever using real mixing desks.
Channel strips are laid out top-down – with input at the top (actually just below the EQ and gain reduction displays), then effects plugins, then sends, then outputs. The pan is still in the wrong place above the fader, and post-fade sends still sit above the fader, but it’s a lot better than it was.
Because green now indicates MIDI plugins, any pre-fade sends, instead of showing as green, just swap the position of knob and aux send selector slot (knob is to the left instead of the right) so you can still tell one from the other. I thought the colour coding was a bit easier to distinguish.
MIDI channel strips place the MIDI plugin effect before (above) the instrument (input) slot, which is logical, since it’s processing the MIDI in between the input (or recorded track) and the virtual instrument plugin.
Plugins that are placed in slots are now easier to move, copy and bypass. You don’t need to switch to the grabber tool to move plugins. Each occupied plugin slot has three zones: a little on/off switch (to bypass the plugin) on the left, a place in the middle to open up the plugin GUI, and on the right is the “plugin select” menu.
New Guitar and Bass tracks and amps – you can create new audio tracks that are already set up for monitoring guitar or bass through Logic’s virtual amp plugins.
This makes it faster to get sounds happening in the studio while you’re being creative. These amps are a bit of an improvement on the earlier offerings. Also – there are a couple more tasty “vintage” guitar pedals for the Pedalboard plug-in.
Tuner
Sometimes it’s the simple things. If you create a new guitar or bass track, you can open up a revamped Tuner using an icon on the top toolbar. It’s so much better than the old tuner, and can even be assigned to a key command. Love it.
Select and move multiple tracks
Finally you can select and move multiple tracks at the same time in the Main window. Another long-term annoyance finally defeated.
Show Master Track quickly and easily inserts the Master Track into the main window. Handy for quickly doing automation for those outro fades.
Mini Volume and pan controls on track header – means you can hide the mixer and inspector panel faders to get the biggest Main window possible, and still quickly tweak track volume/pan if needed.
Gain reduction meter on each channel strip. So you can see the compressor working on each channel. It only works for Logic’s compressor, of course.
The Downside
Actually there’s not too much wrong with this release – Apple have obviously spent a decent amount of time beta-testing.
There’s some minor bugs – sometimes when you click a plugin GUI, it also selects something in the background in Logic as well.
A couple of crashes here and there – no more than usual. For an initial release it’s pretty stable.
There’s a few things missing that I was really hoping would be included – like a revamped EXS24 Sampler and editor.
For me, the dropping of the 32-bit plugin wrapper is a bit of a mixed blessing – it’s an annoyance until manufacturers upgrade all their plugins to 64-bit, but it was always pretty clunky anyway.
Since Pro Tools 11 is driving the 64-bit AAX format update, I’m hoping the 64-bit AU plugins will also be developed at the same time. But I’m keeping my Logic 9 installed just in case.
This new update from Universal Audio sees some new plugins added to the collection as well as an updated control panel for the Apollo.
The new plug-ins are;
Ocean Way Studios – a recreation of this famous recording studio allows you to either recreate the two main room reverbs – or even cooler – you can place instruments within these rooms and adjust some virtual mic positions. You can model the position based on a range of sounds (eg drums or vocals) in their typical locations and mic positions in either of the two rooms. I’ve only had a limited play with this plug-in, but so far I really like it. The rooms sound natural and sweet, and it’s great being able to change the mic selection, move them closer or further away from the source, change phase etc.
SPL Twin-Tube Processor – this plugin allows the adding of tube harmonics. The description doesn’t sound that amazing, but the plug-in does. It seems to add amazing presence and to make things cut through in the mix really easily. Really love this one.
Sonnox Oxford Inflator – a fantastic plugin for increasing the apparent loudness of things without pumping or over-saturating – it’s been around for a while but is now available in the UAD format. One of those essential tools that it’s hard to live without once you’ve used it.
All plugs are now fully 64-bit compatible.
The V7 UAD Apollo console update adds things like Pro Tools mode (remaps the audio i/o ports to more easily use external inserts with Pro Tools), cascading of multiple Apollo units, plus support for the new Apollo 16. It also allows real-time UAD plug-in processing of virtual instruments (handy for live gigs!) by the use of virtual channels in the console.
All in all this is an excellent update to the UAD system – and for those that haven’t yet thought about UAD plug-ins – I thoroughly recommend them – they sound amazing.
The Babysitters Circus – final album mixes. “Electronica / Bass / Funk / Groove”. TBC have hit NZ and the Netherlands Top-10 with previous single “Everything’s Gonna Be Alright”.
Recloose – mix of disco flip of Funkadelic’s “Sexy Ways”
Goon – album mastering and occasional song tweak. Catchy 3-piece indie rock.
MalevolenceNZ – album mastering. One of the mainstay bands of NZ metal. Deathmetal / Grindcore.
Zed Brookes “O Sweet Cacophony” album – completing last few bits of tracking for post-2012 Masters degree submission album.
Various soundalike backing music tracks for Mediaworks “Jono and Ben at 10”
Darkelle – tweaking up a couple more singles for release later this year
Hobby Farm – remixing a couple of demos
Universal Audio have finally released their 64-bit plugins for OSX – at this point only in beta version. They are only recommended for Logic users at present.
The Windows 64-bit versions came out at the end of November 2012, with beta OSX versions promised in December 2012. So they’re only slightly late.
UAD plugins will only run on a choice of various types of UAD host hardware or accelerator cards. They appear in your DAW as typical plugins, but they feature some exquisitely-modeled vintage audio gear.
Hi all,
welcome to the new Brookes Audio Design web site.
It’s mostly working, but I’ve got some ideas, so I’ll be adding to it as time goes on.
Feel free to contact me if you have any audio-tech related questions or need help.
Or pop over to my Creativity, Sound and Culture blog here.
zed